

FAQ
TAL’s Materials and Methods Specifications and recommendations are based on SANS 10107:2011 - Code of Practice for the Design and Installation of Ceramic Tiling.
It should be noted that the lack of movement joints in a tile panel is a major cause of tile failure. They should be specified at the design stage to avoid placing them in heavy traffic areas and spoiling the visual effect of the tiles. Movement joints should be located in both directions at maximum 5 metre centres for interior surface bed applications and maximum 3 metre centres for suspended or Exterior applications. Movement joints should also be located around the perimeter of all floors, in all vertical corners, against obstructions fixed to the structural background and over all discontinuities in building materials, e.g. at interfaces of concrete and brickwork. In addition, movement joints should be located around any fixtures protruding through the tiled surface such as columns or stairs. The joints should be at least 5mm wide and extend through the tile and adhesive layers. All structural expansion joints in the background must be extended throughthe tiles to the surface. The full width of the structural joints must be extended through the tiles to the surface. Seal the joint using TAL GOLD STAR SEALMASTER 1000 polyurethane joint sealant in accordance with the manufacturer’s instructions. It is important that the joint sealant bonds only to the sides of the movement joint.
During the curing process an ordinary cement mortar (concrete, screed or render undergoes a process known as hydration, which is the reaction between cement and water. During this process there will be a certain degree of movement in the substrate as a result of shrinkage caused by the hydration reaction as well as evaporation of the water from the mix. The majority of this reaction occurs within 28 days, and if the tiles are fixed before this hydration has fully taken place, there will be differential movement between the tiles and substrate, resulting in a tile failure (ie the tiles cracking or lifting, or both). A further factor to be considered is that should the moisture content of the substrate be too high, i.e. higher than 5%, this could adversely affect the curing of the tile adhesive, weaken the strength of the tile adhesive and/or cause the tiles to delaminate from the substrate.
When installing tiles, it is important that the correct products are used for the correct applications. Proprietary grouts are formulated with plasticizing agents which enable the grout (and in turn the tile panel) to absorb small movements such as thermal expansion and contraction. A sand/cement mix is very rigid and therefore cannot allow for these small movements, and this can result in a failure within the tile panel.
SABS 0107 – 1996 Code of Practice for the Design and Installation of Ceramic Tilingstates: “Structural movement joints in the bedding and tiling should be sited directly over and be continuous with, and of the same width as, structural movement joints in the substrate”. Construction/movement joints tend to expand and contract and if tiles are laid over these joints there is a very strong possibility that the tiles will either crack over the joint, or come loose, or both. Fixing the tiles with a latex modified adhesive system is not really a solution because although the adhesive system will then be more flexible, the tile itself remains a rigid entity, and will not be able to withstand the stresses that will be placed on it from the movement.
TAL does not recommend tiling directly onto bitumen, or any bitumen-based compounds. This is largely due to plasticizer migration from the bitumen resulting in the deterioration of the integrity of the bitumen and tile adhesive, and a failure of the installation. New generation bitumen systems incorporate a synthetic film on the surface or a surface layer of stone chips. However, whilst these may offer some protection from plasticizer migration, they do not solve the other problems that arise from the thermoplastic nature of the bitumen. The bituminous systems have to be applied at a minimum thickness of 4mm. Being thermoplastic in nature, the bitumen tends to have a ‘’flow’’ character in warm conditions. This reduces support to the adhesive layer and results in failure of the adhesive and, in some cases, tiles are damaged due to the ‘’soft’’ support. If tiling is to take place over a bitumen-based waterproofing system we recommend that a screed, of at least 70mm thickness, be applied over the bitumen.
Grout joints are required between tiles for two main reasons – one being that they serve as “vents” for the adhesive to cure, and the other being that the joints between the tiles allow the individual tiles to move with respect to each other and thus avoid a compressive stress build-up. The minimum recommended joint width between a ceramic floor tile is 5mm, and a minimum of 3mm wide between porcelain tiles.
‘Wet’ areas, such as showers or balconies, should always be waterproofed prior to commencing tiling. Through the introduction of TAL SUPERFLEX and TAL SUREPROOFwaterproofing ranges, it is now possible to fully waterproof a background surface (even dry-walling) and to fix ceramic tiles directly onto the waterproofing using a rapid-setting latex modified tile adhesive.
Wood exhibits various types of movement, making it one of the most difficult substrates on which to tile. Latex modified adhesives will allow for lateral and horizontal movement in the floor, but the tile itself remains a rigid material and excessive vertical deflection movement in the background could result in a failure of the tile installation, i.e. tiles cracking or coming loose, or both.
Powerfloated (and steelfloated) surfaces are very smooth and dense, and therefore it is imperative that the surface is correctly prepared prior to the adhesive application to ensure a good bond onto the substrate. The recommended surface preparation is to either mechanically abrade the surface (i.e. scabbling, scarifying, shotblasting, etc), or to prime the surface with a slurry consisting of one part TAL KEYCOAT mixed with two parts ordinary cement (by volume), which is applied by block-brush. The adhesive must be applied while this slurry coat is STILL TACKY.
The following steps will ensure a successful under tile heating installation : The surface where the under tile heating is to be installed must be primed prior to the heating elements being installed, as follows: Woodfloated (rough, porous) surfaces- prime with a coat of TAL FLOOR PRIMER. Powerfloated or steelfloated (smooth, dense) surfaces - prime with a slurry consisting of one part TAL FLOORKEY mixed with two parts ordinary cement (by volume) which is applied by block brush. • The under-tile heating should be laid and pinned in place in accordance with TILING Tile adhesives do not have the same compressive strength as screeding compounds. Tile adhesives are far thicker than screeding compounds and will not be able to penetrate through the fibres in the mat.
It is possible to tile onto existing tiles, provided that the tiles are in good condition and firmly attached to the background, i.e. are not loose, damaged or hollow-sounding. The tiles must be clean, dry and free from all traces of dust, grease, grime, polish or varnish. The tiles should be acid washed, neutralized and if necessary, a degreasing compound should be used to remove any residual grease or sealant residues. All damaged, cracked, loose or hollow-sounding tiles must be removed, as well as the existing fixative, to expose the underlying substrate, which must be firm and sound. There areas can then be filled so that they are flush with the adjacent tiles using TAL RAPIDFIX. The existing tiles must be primed with a slurry consisting of one part TAL KEYCOAT to two parts ordinary cement (by volume), which is applied by block brush. While this slurry coat is STILL TACKY, the adhesive must be applied. Because the existing tiles will present a dense, impervious surface, the new tiles should be installed using TAL GOLDSTAR 6 rapid setting adhesive.
Exterior tile installations have certain demands that interior tile installations do not have. Over and above normal building movement, exterior tile installations will also be exposed to thermal expansion and contraction and inclement weather conditions (including frost and snow in some regions).
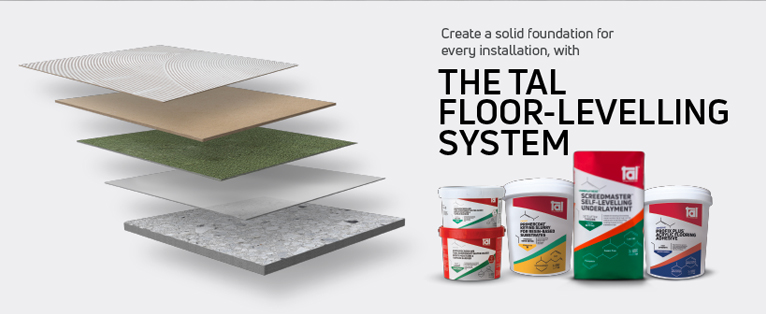
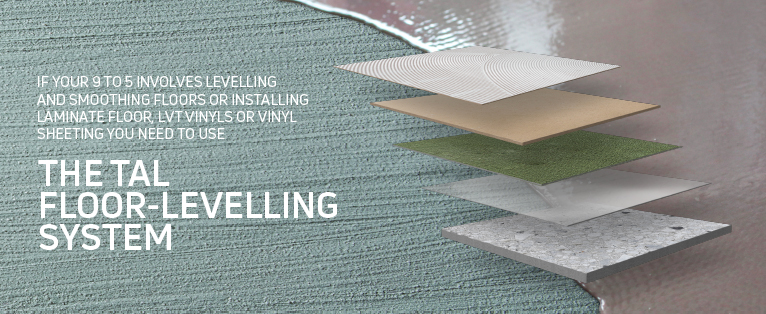
Basically, any tile exceeding 600 x 600mm is considered a large format tile. With a smaller number of joints between large format tiles, compared with the same area of normal format tiling, less stress (movement) can be accommodated at tile joints. This impacts on the adhesive system, particularly in areas where movement is expected. It is imperative that latex modified adhesive and grout systems are used in areas where movement is expected, and quick-setting adhesives are preferable. TAL has developed TAL GOLDSTAR XL large format tile adhesive which is a grey quick-setting high-strength shrinkage-compensated cement-based adhesive for fixing large format ceramic, porcelain, dark-coloured natural stone (granite, marble, sandstone, etc) tiles to walls and floors. The adhesive was designed for easy use, allowing a 4-hour pot life and a 30-minute open time. Special note must be taken of the following when fixing large format tiles : There are permissible manufacturing tolerances for ceramic and porcelain tiles, and large format tiles may have permissible surface flatness irregularities, ie the tile surface may be ‘curved’ or ‘bowed’. For the installation of large format tiles it is imperative that the substrate to be tiled is totally flat and level. Variations in levels in the substrate must be rectified prior to the tile installation. TAL SCREEDMASTER and TAL SUPERSCREED SL self-levelling underlayment compounds are ideal for levelling of floors prior to the installation of large format tiles. The use of self-levelling spacer/clip systems will further assist in reducing ‘lippage’ of tiles. The joint width for fixing large format porcelain tiles (including rectified tiles) should be no less than 3mm wide, and no less than 5mm wide between ceramic tiles. With a smaller number of joints between large format tiles, compared with the same area of normal format tiling, less stress (movement) can be accommodated at tile joints.Why must i have movement joints in my tile installations?
Why do I have to leave my plaster or screed to 'cure' before I start tiling?
For this reason good tiling practice dictates that enough time should be left for both the structure itself and the screed or render to stabilise before commencing with the tiling operation. Please refer to the British Standard for Wall & Floor Tilin (BS5385 1989/90) and SABS 0107-1996 Code of Practice for the Design and Installation of Ceramic Tiling.
TAL’s materials and methods specifications are based on SABS 0107 : 1996, and thus call for a minimum 28 day curing period for new concrete or screeds, and a minimum of 14 days for new render. These curing periods are enough time for the screed or render to hydrate, and the moisture content usually reduces to 5% or lower during the curing periods.Why can't I use cement as grout?
Why can't I tile over structural/construction joints?
Why can't I tile over bitumen based waterproofing systems?
Why can't I butt joint my tiles?
How do I waterproof my shower or balcony?
Please refer to the relevant data sheets on this website, or contact us for a materials and methods specification for waterproofing and tiling these areas.
How do I tile onto a wooden floor?
Only exterior grade board should be used externally or in ‘wet’ applications. The background preparation of the wooden floor (i.e. sanding, bracing, sealing, priming, etc) is critical for a successful installation.
Suspended wooden floors must be in good condition and must be thoroughly braced at maximum 300mm in each direction (screwed, not nailed). If necessary, another layer of board can by laid over the wooden floor to increase the rigidness of the floor. The board must be firmly anchored, by means of screws, at maximum 300mm in each direction.
Wooden surfaces must be sanded down to remove all traces of existing polishes, varnishes, coatings or sealants. The wooden surface must be clean, dry, firm and sound and free from dust, loose particles and all traces of surface contaminants.
New installations should be left for at least 24 hours to reach ambient temperatures before tiling to minimize the risk of warping. Ensure there is adequate under-floor ventilation below wood composite floors to prevent rot once the wooden surface is sealed and tiled.
Please refer to the relevant general specification on this website, or contact us for a project specific materials and methods specification.
How do I prepare a powerfloated floor before tiling?
How do I install under tile heating elements?
Background Preparation
The floor must be in good condition, firm and sound, and must have a moisture content of 5% or less. The surface must be clean and dry and free from all traces of dust, debris, existing coatings or coverings, old fixatives, etc.
the manufacturer’s instructions once the priming coat is dry.
Screeding
Add 20kg TAL SUPERSCREED to 5 litres of TAL SCREEDBINDER (replacing the water in the mix), and mix until a smooth, lump-free paste is obtained. Stir occasionally whilst in use. Do not mix up more than can be used in 20 –30 minutes.
Apply TAL SUPERSCREED mixed with TAL SCREEDBINDER over the elements, ensuring that all wires are completely covered. Work to a smooth, level surface. Allow 24 hours drying time before proceeding.
NOTE : If a separating covering mat is to be used, this must be placed in the wet screed over the heating elements. A further layer of TAL SUPERSCREED mixed with TAL SCREEDBINDER at least 2mm thick must be applied over the mat, ensuring that the mat is totally saturated from both sides and forms part of the levelling compound. Allow 24 hours drying time before proceeding.
Tiles should be installed using a latex modified adhesive system, i.e. TAL BOND should be used as a total water replacement in the adhesive and grout mix. Tile panel movement joints should be created at maximum 3 meter centres in both directions, as well as around the perimeter of the floor.
NOTE : Allow the system to fully cure before switching the ceramic heaters on, i.e. wait at least 28 days.
Tile adhesives should not be used to cover under tile heating elements because :
Can I tile over existing floor tiles?
Are there special requirements when tiling exterior walls and floors?
It is therefore a standard recommendation when tiling exterior / exposed applications that the adhesive and grout be mixed with TAL BOND, as a total water replacement, to enhance the bond strength, flexibility and water resistance of the adhesive and grout (refer to the packaging for the correct mix ratios). Polymer modified adhesives are also suitable.
A solid bed of adhesive must be achieved behind each tile to prevent water collecting behind the tiles.
When tiling walls the adhesive system must be assisted by means of a form of mechanical fixing at maximum 2 metre horizontal intervals, especially when fixing heavy and/or large format tiles.
It is also very important that the ingress of water behind wall tiles is prevented. If the top of the installation is not going to be ‘capped’ with a tile, we recommend that a wide bead of TAL GOLD STAR SEALMASTER 1000 polyurethane joint sealant be applied over the adhesive ‘joint’ between the tile and background. Exterior installations must also be protected against inclement weather and too rapid drying throughout the duration of the installation.
Are there special requirements when installing large format tiles?