General specification for waterproofing and fixing glazed ceramic or porcelain tiles onto rendered walls and glazed ceramic or porcelain mosaics onto the screeded floor in a shower
Please note that ‘general’ specifications are issued for information purposes, and should not be used as project specifications.
As each and every project needs to be assessed individually on its own merits and characteristics please contact the TAL Technical Advice Centre for a project-specific detailed materials and methods specification for specific projects.
It is important that the tile selected is suitable for the application, preferably against a written Supplier’s specification. Factors such as water absorption, irreversible moisture expansion, MOR and PEI ratings, chemical resistance and overall stability of the product need to meet the requirements of the service conditions.
The backs of all tiles must be clean and free from dust and contaminants.
TAL PRODUCT REQUIREMENTS
The TAL products required for this installation are as follows :
Waterproofing Installation
TAL FLOOR PRIMER / TAL FLOORKEY
TAL SUPERFLEX
TAL SUPERFLEX MEMBRANE
Tile Installation
TAL GOLDSTAR 6 – Ceramic and Porcelain Tiles / Mosaics – grey finish
TAL MARBLEFIX – Mosaics – off-white finish
TAL BOND / TAL BOND POWDER
TAL WALL & FLOOR GROUT
NOTCHED FLOOR TROWEL
SPACERS
Special note must be taken of the following:
Adhesive System:
We have specified the use of TAL GOLDSTAR 6 rapid setting high strength adhesive for the installation of these tiles. However, if timing on this project allows for a quick setting adhesive option, then TAL GOLDSTAR 12 can be considered.
The advantages of using TAL GOLDSTAR 12 are as follows:
- TAL GOLDSTAR 12 has a longer pot life (pot life of 4 hours, grout after 6 – 8 hours, and traffic after 12 hours)
- TAL GOLDSTAR 12 is more cost effective than TAL GOLDSTAR 6
It is however important that newly installed tiles are protected from traffic (other trades, etc) for a minimum of 12 hours, while the adhesive sets. This is especially important in fast-track installations.
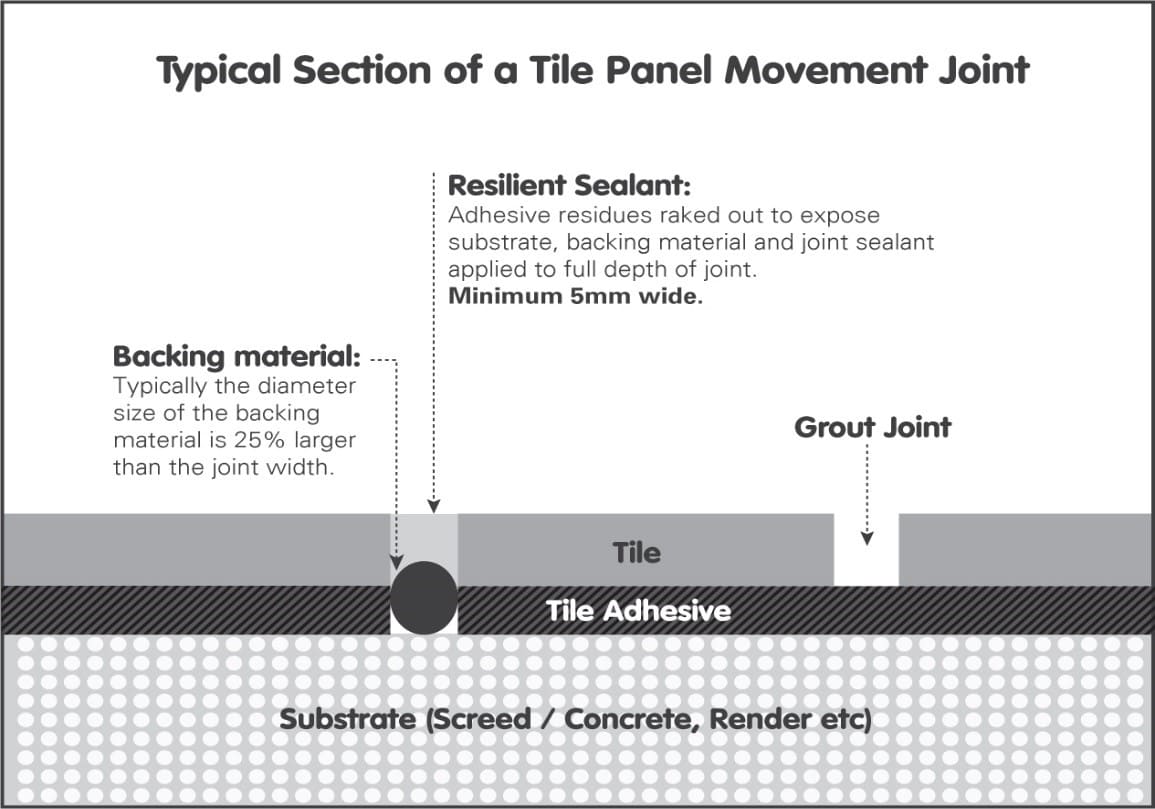
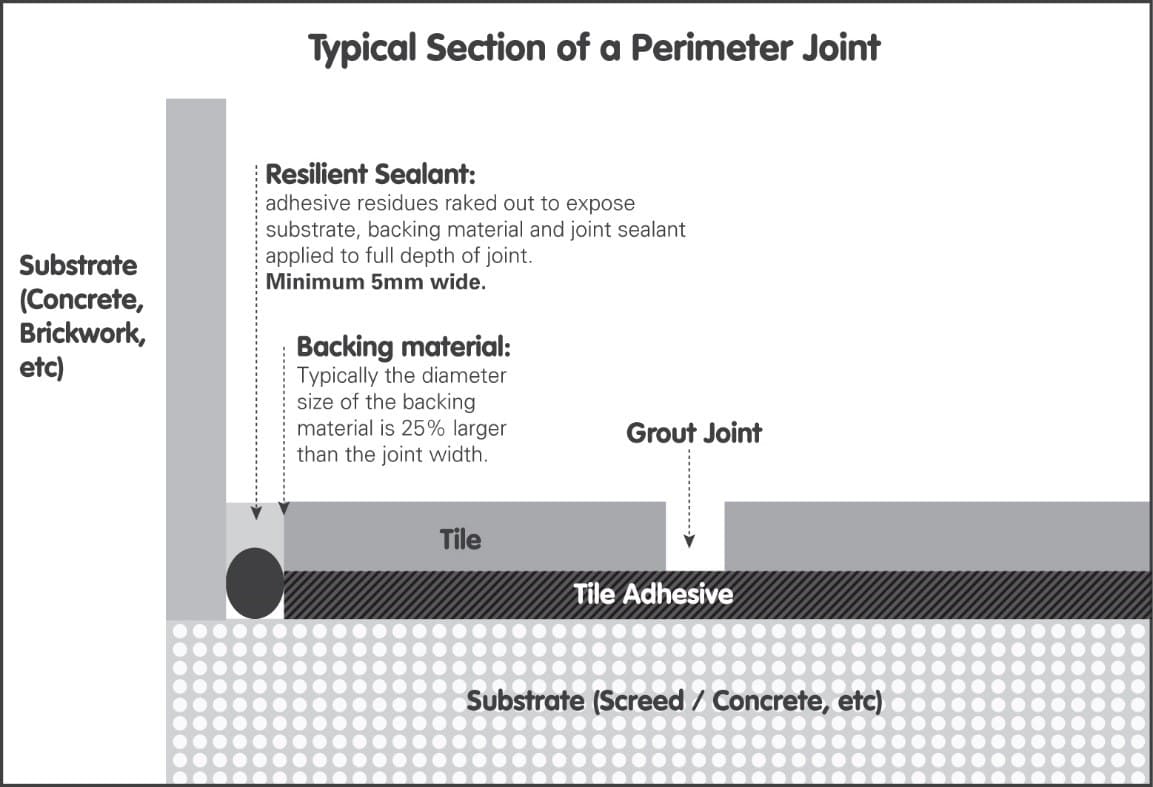
Tile Panel Movement Joints & Perimeter Joints:
It should be noted that the lack of movement joints in a tile panel, or poorly constructed joints, is a major cause of tile failure. Joints must be created at the required spacing and must be well raked out to remove all traces of adhesive residues, debris, contamination, etc, ie the joint must extend through the tile and tile adhesive layers. These joints must be filled with a suitable resilient Joint Sealant (and suitable backing cord where applicable) in accordance with the manufacturer’s instructions.
(See later detail of correctly constructed tile panel movement joint and perimeter joint.)
Mosaics :
Mosaics are available in glazed and unglazed ceramic, porcelain, natural stone and glass, in a variety of shapes and sizes. To facilitate ease of handling, mosaics are assembled as sheets, the individual tessera being glued either face-down onto paper or plastic (paper-faced mosaics), or bed side down onto a synthetic mesh backing, fabric, or onto small tabs. Paper-faced mosaics are preferable since they allow full contact to be achieved with the adhesive bedding.
When sheets are assembled by means of a backing mesh, the mesh should be made of water-resistant synthetic fabric such as nylon, and not from cotton or paper.
In the case of a mosaic that has been assembled with a fabric backing or tabs, the following is critical for a successful installation:
- the fabric or tabs and the bonding adhesive should not occupy more than 25% of the areas of each tessera; the critical factor is the contact of the adhesive with the backs of the tessera, and
- the fabric or tabs and the bonding adhesive should be water resistant, should not weaken when exposed to moisture, and should be compatible with the adhesive bed
Furthermore:
- the backs of the sheets must be clean and dry, and not contaminated with dust or powder
- the application of mosaics requires effective supervision and the employment of skilled operatives
- the bonding and grouting of mosaics should be done in one operation in order to provide a strong installation
- the mosaics should be FIRMLY bedded into the adhesive to ensure good contact between the adhesive and tile
- due care must be taken to ensure that glass mosaics do not get scratched by the adhesive during application and cleaning
- all mosaics should be inspected, and loose or damaged tessera removed and replaced before installation.
- BACKGROUND PREPARATION & WATERPROOFING
- Walls
- Allow all new wall rendering to cure for at least 14 days. The rendering must be firmly attached to the substrate, must be integrally sound (no crumbling, cracking, etc) and must be of a quality and consistency suitable for waterproofing and tiling. All damaged, defective, deteriorated or hollow sounding areas must be removed and made good before proceeding. Renders should be left with a woodfloat finish and should not be skimcoated with gypsum plaster. The surface must be clean, dry, firm and sound and free from all traces of dust, loose particles and surface contaminants.
- Floors
- Allow all new screeds to cure for at least 4 weeks before proceeding.
- The screeding must be firmly attached to the underlying concrete, must be integrally sound (no crumbling, cracking, etc) and must be of a quality and consistency suitable for waterproofing and tiling. All damaged, defective, deteriorated or hollow sounding areas must be removed and the floor made good before proceeding. The surface must be clean and dry and free of all traces of dust, debris, loose particles and surface contaminants.
- Waterproofing
As showers are classified as “wet” areas, we recommend that they be waterproofed using TAL SUPERFLEX . TAL SUPERFLEX , when reinforced with TAL SUPERFLEX MEMBRANE, forms a seamless waterproofing membrane.
The substrate must have a moisture content of less than 3% before the waterproofing can be applied.- All surfaces to be waterproofed must be primed prior to the waterproofing application. Woodfloated surfaces must be primed with a coat of neat TAL FLOOR PRIMER, and powerfloated or steelfloated surfaces must be primed with a slurry consisting of 1 part TAL FLOORKEY mixed with 2 parts TAL KEYMIX powder or 2 parts GOLDSTAR 6 or 12 powder (by volume), which is applied by block brush.
- Coving Areas, Internal Corners, Tap & Rose Plumbing
- To allow for movement, apply a 10mm bead of flexible silicone sealant into the interface between the wall and floor, between internal vertical corners and around tap and rose plumbing prior to the SUPERFLEX application.
Due care must be taken to ensure that the silicone bead is not flattened out - ie the silicone must be allowed to cure for approximately 12 – 24 hours. - Apply a coat of TAL SUPERFLEX by paint roller or block brush to these interfaces. Immediately roll out the SUPERFLEX MEMBRANE (200mm wide) into the wet SUPERFLEX with the membrane extending 100mm equally on either side of the interface, ensuring that there are no wrinkles or air bubbles trapped beneath the membrane. The membrane must be pushed into the corners, ensuring that the entire interface is covered with SUPERFLEX MEMBRANE. Apply a heavy topcoat of SUPERFLEX to completely saturate the membrane before the first coat of SUPERFLEX dries.
- To allow for movement, apply a 10mm bead of flexible silicone sealant into the interface between the wall and floor, between internal vertical corners and around tap and rose plumbing prior to the SUPERFLEX application.
- Floor Waste / Full Bore Drains
- Apply a coat of TAL SUPERFLEX up the pipes and immediately position the strip of SUPERFLEX MEMBRANE into the wet TAL SUPERFLEX. Apply a second coat of TAL SUPERFLEX to completely saturate the membrane. For wastes that are flush with the floor, take the application down into and around the waste.
- Shower Floor & Walls
- For the larger areas apply a coat of SUPERFLEX over the primed surface. Immediately roll out the SUPERFLEX MEMBRANE into the wet SUPERFLEX. Ensure that there are no wrinkles or air bubbles trapped beneath the membrane and that the membrane is adhered to the substrate by pressing the membrane with the roller in 2 different directions. Cover only sufficient area at a time that would allow impregnation of the membrane before the first coat of SUPERFLEX dries. The membrane should have a minimum overlap of 50mm. Apply a heavy topcoat of SUPERFLEX to completely saturate the membrane. A coverage rate of 2 litres / m² of SUPERFLEX for both coats should provide complete saturation.
- It is essential to ensure that the main SUPERFLEX application overlaps the corner joints, ie the interface application must be completely covered by the main area application.
- Shower walls must be waterproofed up to full shower rose height.
- Allow the SUPERFLEX system to dry completely (at least 3 days, depending on ambient conditions) before fixing of tiles.
(For more detailed information, please contact TAL for a Technical Data Sheet on the product.)
- Walls
- ADHESIVE SYSTEM
- Glazed Ceramic and Porcelain Tiles
- Apply TAL GOLDSTAR rapid-setting adhesive mixed 20kg with 5 litres of TAL BOND (replacing the water in the mix) to the background using a notched trowel.
Alternatively, TAL BOND POWDER may be added to the adhesive mixing water at a ratio of 1 x 1kg sachet per 20kg TAL GOLDSTAR 6, or TAL GOLDFLEX single-part flexible rapid-setting adhesive may be used. When using TAL GOLDFLEX no additives are required, simply mix with clean water, alleviating possible mixing errors on site. - In this tiling situation it is imperative that there is a solid bed of adhesive at least 5mm thick beneath each tile. We would recommend the use of a notched FLOOR TROWEL.
- At no time spread more adhesive than can be tiled onto in 10 – 15 minutes. Depending on atmospheric conditions, this will normally be around 1 square metre. This prevents the adhesive from drying or “skinning” before the tiles are applied.
- Bed dry tiles (do not soak) firmly into the wet adhesive with a twisting action to ensure full contact between the background, tiles and adhesive. Tiles should be well tapped home with a rubber mallet or the wooden handle of a trowel. It is sound practice to remove the occasional tile to ensure that good contact has been achieved.
- When using heavily lugged tiles, or tiles with a very irregular back profile, it is good practice to butter the back of each tile, ensuring that the grooves or dovetails are completely filled with adhesive.
- Clean off any surplus adhesive remaining on the face of tiles and between the joints with a damp sponge before the adhesive dries.
- Never butt joint tiles. Joints are required to allow the individual tiles to move with respect to each other and thus avoid a compressive stress build-up. They are also required as vents for the tile adhesive to cure. The joints between ceramic wall tiles must be a minimum of 2mm wide, a minimum of 5mm wide between ceramic floor tiles, and a minimum of 3mm wide between porcelain tiles.
- Pot life of the adhesive will vary with climatic conditions. Under no circumstances should adhesive which has been left standing for too long be reconstituted by adding more liquid.
- Do not tile over structural, expansion or cold joints in the background. These joints must be extended through the various layers to the surface.
- NOTE : Ensure that heavy and/or large format wall tiles are well supported by means of a batten or some type of mechanical device until such time that the adhesive has fully cured. In this situation it will be 6 hours.
- Apply TAL GOLDSTAR rapid-setting adhesive mixed 20kg with 5 litres of TAL BOND (replacing the water in the mix) to the background using a notched trowel.
- Glazed Ceramic and Porcelain Mosaics
The bonding and grouting of mosaics should be done in one operation in order to provide a strong installation. The mosaics should be FIRMLY bedded into the adhesive to ensure good contact between the adhesive and tile.- Grey Finish
- Add 20kg TAL GOLDSTAR 6 grey rapid-setting adhesive to 5 litres of TAL BOND (replacing the water in the mix) and mix to a smooth, creamy consistency.
Alternatively, TAL BOND POWDER may be added to the adhesive mixing water at a ratio of 1 x 1kg sachet per 20kg TAL GOLDSTAR 6, or TAL GOLDFLEX single-part grey flexible rapid-setting adhesive may be used. When using TAL GOLDFLEX no additives are required, simply mix with clean water, alleviating possible mixing errors on site.
- Add 20kg TAL GOLDSTAR 6 grey rapid-setting adhesive to 5 litres of TAL BOND (replacing the water in the mix) and mix to a smooth, creamy consistency.
- Off White Finish
- Add 20kg TAL MARBLEFIX light-coloured rapid-setting adhesive to 5.5 litres of TAL BOND (replacing the water in the mix) and mix to a smooth, creamy consistency.
Alternatively, TAL BOND POWDER may be added to the adhesive mixing water at a ratio of 1 x 1kg sachet per 20kg TAL MARBLEFIX, or TAL MARBLEFLEX single-part light-coloured flexible rapid-setting adhesive may be used. When using TAL MARBLEFLEX no additives are required, simply mix with clean water, alleviating possible mixing errors on site.
- Add 20kg TAL MARBLEFIX light-coloured rapid-setting adhesive to 5.5 litres of TAL BOND (replacing the water in the mix) and mix to a smooth, creamy consistency.
- Paper-Covered Mosaics
- The adhesive is applied to the surface in a solid bed of 4 – 6mm. The mosaics are pre-grouted by working adhesive into the joints between the mosaics from the back.
- Immediately, FIRMLY bed the mosaics into the adhesive on the background. A wooden beating block or rubber grouting float can be used to create a flat surface.
- Allow the adhesive to dry sufficiently, and then gently remove the paper covering on the mosaics with a dampened sponge. Excessive water must be avoided as this may compromise the integrity of the adhesive. If necessary, fill any voids or depressions with the adhesive mixture.
- Mesh-Backed Mosaics
- The adhesive is applied to the surface in a solid bed of 4 – 6mm. Immediately, FIRMLY bed the mosaics into the adhesive. A wooden beating block or rubber grouting float can be used to create a flat surface. Allow the adhesive to squeeze out through the joints between the mosaics to form the grout. If necessary, fill any voids or depressions in the joints with extra adhesive.
- Grey Finish
- General
- The adhesive is applied to the surface in a solid bed of 4 – 6mm. (The adhesive can be applied using a NOTCHED FLOOR TROWEL, and the adhesive then smoothed with the straight edge of the trowel to flatten the ridges.)
- Gently clean any excess adhesive off the face of the mosaics before it hardens.
- At no time spread more adhesive than can be tiled onto in 10 – 15 minutes. Depending on atmospheric conditions, this will normally be around 1 square metre. This prevents the adhesive from drying or “skinning” before the tiles are applied.
- Pot life of the adhesive will vary with climatic conditions. Under no circumstances should adhesive which has been left standing for too long be reconstituted by adding more liquid.
- Leave a ‘grout joint’ between the mosaic sheets, the same width as the joints between the mosaics on the sheets.
- Do not tile over structural, expansion or cold joints in the background. These joints must be extended through the various layers to the surface.
- A sample of the tiles to be used should be tested beforehand to ensure that no adhesive is absorbed through the glaze, or into the tile body, causing permanent staining of the tiles.
- Glazed Ceramic and Porcelain Tiles
-
-
-
-
-
- GROUTING (Tiles)
- Grouting must not be carried out until sufficient bond has developed between the bedding mix and the tiles to preclude disturbance of the tiles during the grouting operation. Allow a minimum of 4 hours before grouting.
- Use Super White or coloured TAL WALL & FLOOR GROUT mixed 20kg with 8 litres of TAL BOND (Super White Grout) (replacing the water in the mix) or 6 litres of TAL BOND (all other colours) (replacing the water in the mix) for filling tile joints up to 8mm wide.
* NOTE: TAL Super White Grout is only suitable for wall tile joints up to 3mm wide.
Alternatively, TAL BOND POWDER may be added to the grout mixing water, at a ratio of 1 x 1kg sachet per 20kg TAL WALL & FLOOR GROUT. - WARNING:
- Particular care must be taken to clean the grout off the tile face before it hardens completely. This is especially important when an additive such as TAL BOND or TAL BOND POWDER has been used.
- A sample of the tiles to be used should be tested beforehand to ensure that no grout is absorbed through the glaze, or into the tile body, causing permanent staining of the tiles.
- It is important to use the stipulated amount of liquid in the TAL Grout mixture. When cleaning, a damp, not wet , sponge must be used. Over hydration (too much water) of the mix, or in cleaning, causes colour variations in the grout joints, and also affects the integrity of the grout, resulting in a friable product.
- MOVEMENT JOINTS
- It should be noted that the lack of movement joints in a tile panel is a major cause of tile failure. They should be specified at the design stage to avoid placing them in heavy traffic areas and spoiling the visual effect of the tiles.
- Movement joints should be located around the perimeter of the shower floors, in all internal corners and interfaces, and at maximum 3 metre centres for large areas.
- Movement joints should also be located against obstructions fixed to the structural background and over all discontinuities in building materials, e.g. at interfaces of concrete and brickwork. In addition, movement joints should be located around any fixtures protruding through the tiled surface.
- The joints should be at least 5mm wide and extend through the adhesive and tile layers. All construction / cold joints and structural joints in the background must be extended through the adhesive and tile layers to the surface in the form of tile panel movement joints. With regards to structural joints, the full width of the structural joints must be respected and extended through the adhesive and tile layers to the surface.
- Where practical, the bulk of the depth of the movement joint can be filled with an inexpensive, compressible material such as polyethylene foam strips.
- Seal the joint using a suitable resilient sealant in accordance with the manufacturer’s instructions. It is important that the joint sealant bonds only to the sides of the movement joint.
- For the key requirements common to all tiling situations please refer to SANS 10107-2011 Code of Practice for the Design and Installation of Ceramic Tiling.
Note : This installation must be allowed to set sufficiently (minimum 5 days) before being subjected to service conditions.
Should you require any further assistance or have any queries regarding the above, please do not hesitate to contact us. Assuring you of our best attention at all times.
Yours sincerely,
SHARON MARGON
TECHNICAL ADVICE SUPERVISOR
©TAL 1972 & 1984
- GROUTING (Tiles)
-
-
-
-