How to prepare a subfloor for laminate flooring
Laminate flooring is easy to install yourself, but requires a level subfloor that is free of moisture. Keep in mind that not all flat surfaces are level and that the floor may slope or consist of peaks and valleys that need to be levelled out before laminate flooring can be installed. Laminate flooring can be installed over existing tiles, but the floor needs to be level within a tolerance of 3mm per square metre.

Use a screed such as TAL Superscreed to level the subfloor. TAL Superscreed is designed to produce a level, smooth and hard wearing floor surface prior to the fixing of floor coverings with minimum installation time. Floor coverings can be fixed after 24 hours, depending on application thickness and ambient conditions.
SURFACE PREPARATION
- All surface beds must have a damp proof membrane.
- The surface must be structurally sound, clean and dry and free from all surface laitance and contaminants.
- All holes or voids in the floor must be identified and filled with TAL Rapidfix and all ‘highs' or trowel marks must be identified and ground down.
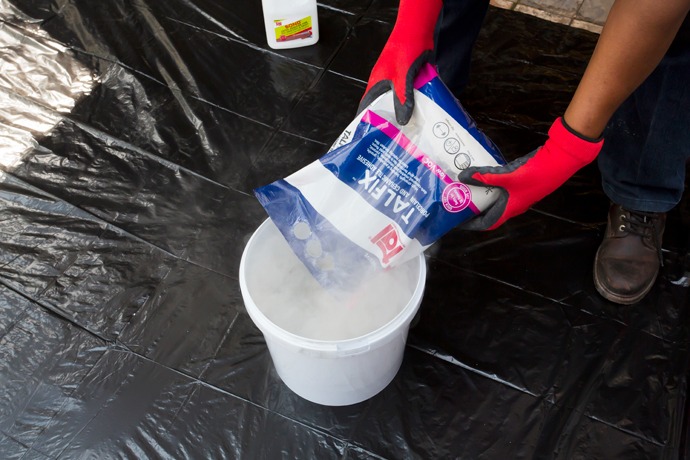
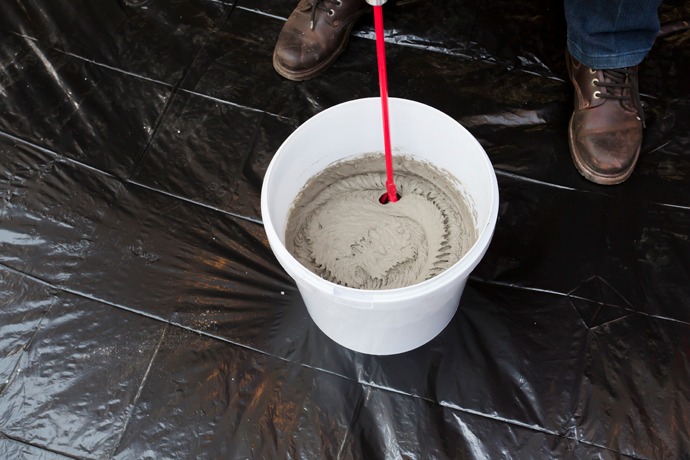
MIXING
- Add 20kg of TAL Superscreed to 5 litres of clean water while stirring slowly with an electric drill of 1.1kg with a mixing paddle attached.
- The temperature of the water must be between 20 - 25°C when mixed with TAL Superscreed.
- Mix until a smooth, lump-free paste is obtained.
- Stir occasionally whilst in use. Do not mix up more than can be used in 20 - 30 minutes.
- For best results use a full bag in one mix.
APPLICATION
- Pour the mix onto the floor and spread using a 600mm extended straight edge steel trowel and work until a smooth, level surface is achieved.
- TAL Superscreed can be applied from featheredge up to 12mm in a single operation.
- Trowel marks and high spots can be removed with coarse sandpaper or a corundum stone when the screed is dry.
- Allow the screed layer to dry for 3 - 4 hours at a 1 - 2mm thickness. Grind the floor down where necessary to remove all trowel marks before applying the next layer, if required.
- The floor must be primed with a coat of TAL Floor Primer before each subsequent application of TAL Superscreed. TAL Superscreed must be applied when the TAL Floor Primer coat is touch dry. Repeat as necessary until the desired finish and level is achieved. Grind the floor down to remove any trowel marks
- Drying times and trafficking vary from 3 hours upwards dependant on the thickness of the application.
- Allow the layer to dry fully before proceeding with laying floor covering or subjecting to traffic. When screeds above 3mm thickness are laid they must be allowed to dry overnight before trafficking or installing floor coverings.
To access the product data sheet for TAL Superscreed click here: TAL SUPERSCREED.

Tests conducted by the South African Bureau of Standards (SABS) show that X-Tech StoneFlow has a compressive strength in excess of 30MPa at 24h. SABS is conducting a wide range of performance tests on the product to give customers confidence that they are getting a state of the art product. The surface can be subjected to light foot traffic after three hours. The floor can be subjected to surface conditions, such as grinding and the first stages of polishing within five hours of placement, depending on application thickness and ambient conditions.
Application of X-Tech StoneFlow requires fully trained specialist contractors as it involves grinding and polishing. The final finish is only achieved by using specialised equipment such as the HTC super floor polisher range, designed to polish concrete Terrazzo and similar types of floors.
The HTC Sealer is applied before final stage polishing to prevent moisture penetration and staining. The sealer penetrates the concrete and therefore does not create a synthetic look but rather leaves the concrete with a natural finish. The floor also requires maintenance polishing to uphold its high-gloss shine. No chemicals are required during the maintenance polishing process, only water in conjunction with the HTC Twister range of polishing pads; therefore the floor saves on maintenance costs. X-Tech StoneFlow was recently supplied and installed by Rock Solid Flooring for the refurbishment of the Vigour and Verve coffee bar at the Southern Sun Elangeni & Maharani hotel complex in Durban where it created a decorative brick red and granite-looking floor finish.
TAL provides quality construction solutions from concept to completion and its screed and cement range produces smooth, high strength and hard wearing floor surfaces.
The company has the ability to develop bespoke construction products to suit its customers’ requirements whether they’re specifiers, architects or contractors. TAL’s products are manufactured locally, are compatible with South Africa’s climate conditions and are in line with the latest technology. X-Calibur Construction Chemistry forms part of the TAL building solutions range and consists of construction product solutions with an emphasis on flooring and surface treatments, concrete repair and protection as well as anchor groutings and fixings, sealers and coatings, floor hardening compounds and waterproofing systems. X-Tech StoneFlow forms part of the X-Calibur range locally manufactured by TAL X-Calibur under license from X-Calibur Construction Chemistry Incorporated. TAL is ISO 9001:2008 quality management system certified and its products are designed, manufactured and tested to TAL standards, assuring customers that products will perform to specification.
Contact the TAL Technical Advisory Service on 0860 000 (TAL) 825 for details and specialist contractors who can apply X-Tech StoneFlow. For more information visit www.x-calibur.co.za and www.tal.co.za.
Contact the TAL Technical Advisory Service on 0860 000 (TAL) 825 for details and specialist contractors who can apply TAL X-Calibur X-Tech SuperFlow. For more information visit www.x-calibur.co.za and www.tal.co.za
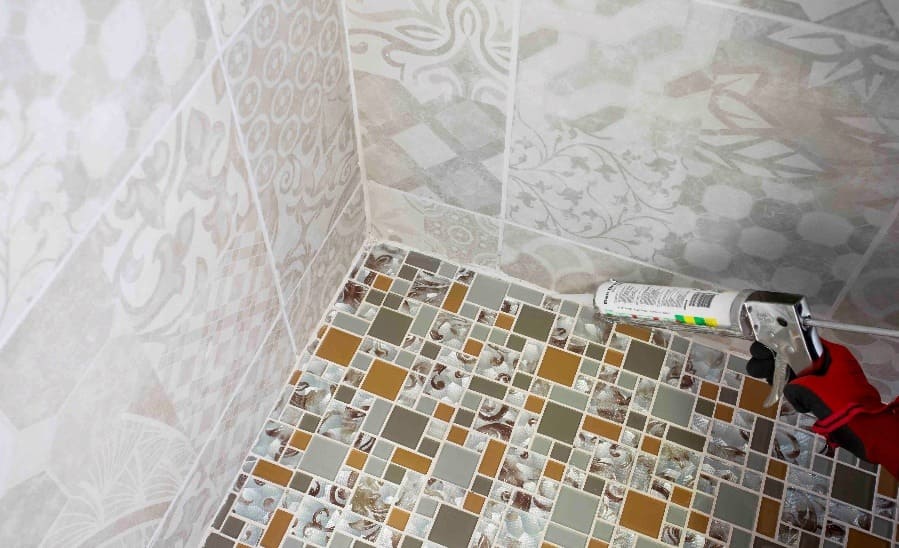
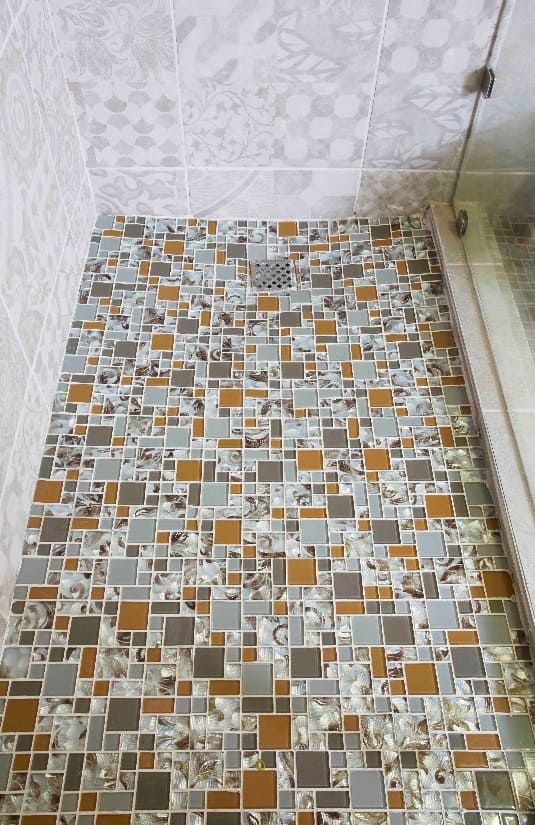
Also ensure that the spacer size you use is correct for the type of tile you have selected; the joint width between glazed ceramic floor tiles should be a minimum of 5mm wide, and a minimum of 3mm wide between porcelain tiles, including rectified porcelain tiles. To achieve the natural look, opt for grout colour that is darker than the tile itself. Click here to find out more about how to select the perfect grout colour.
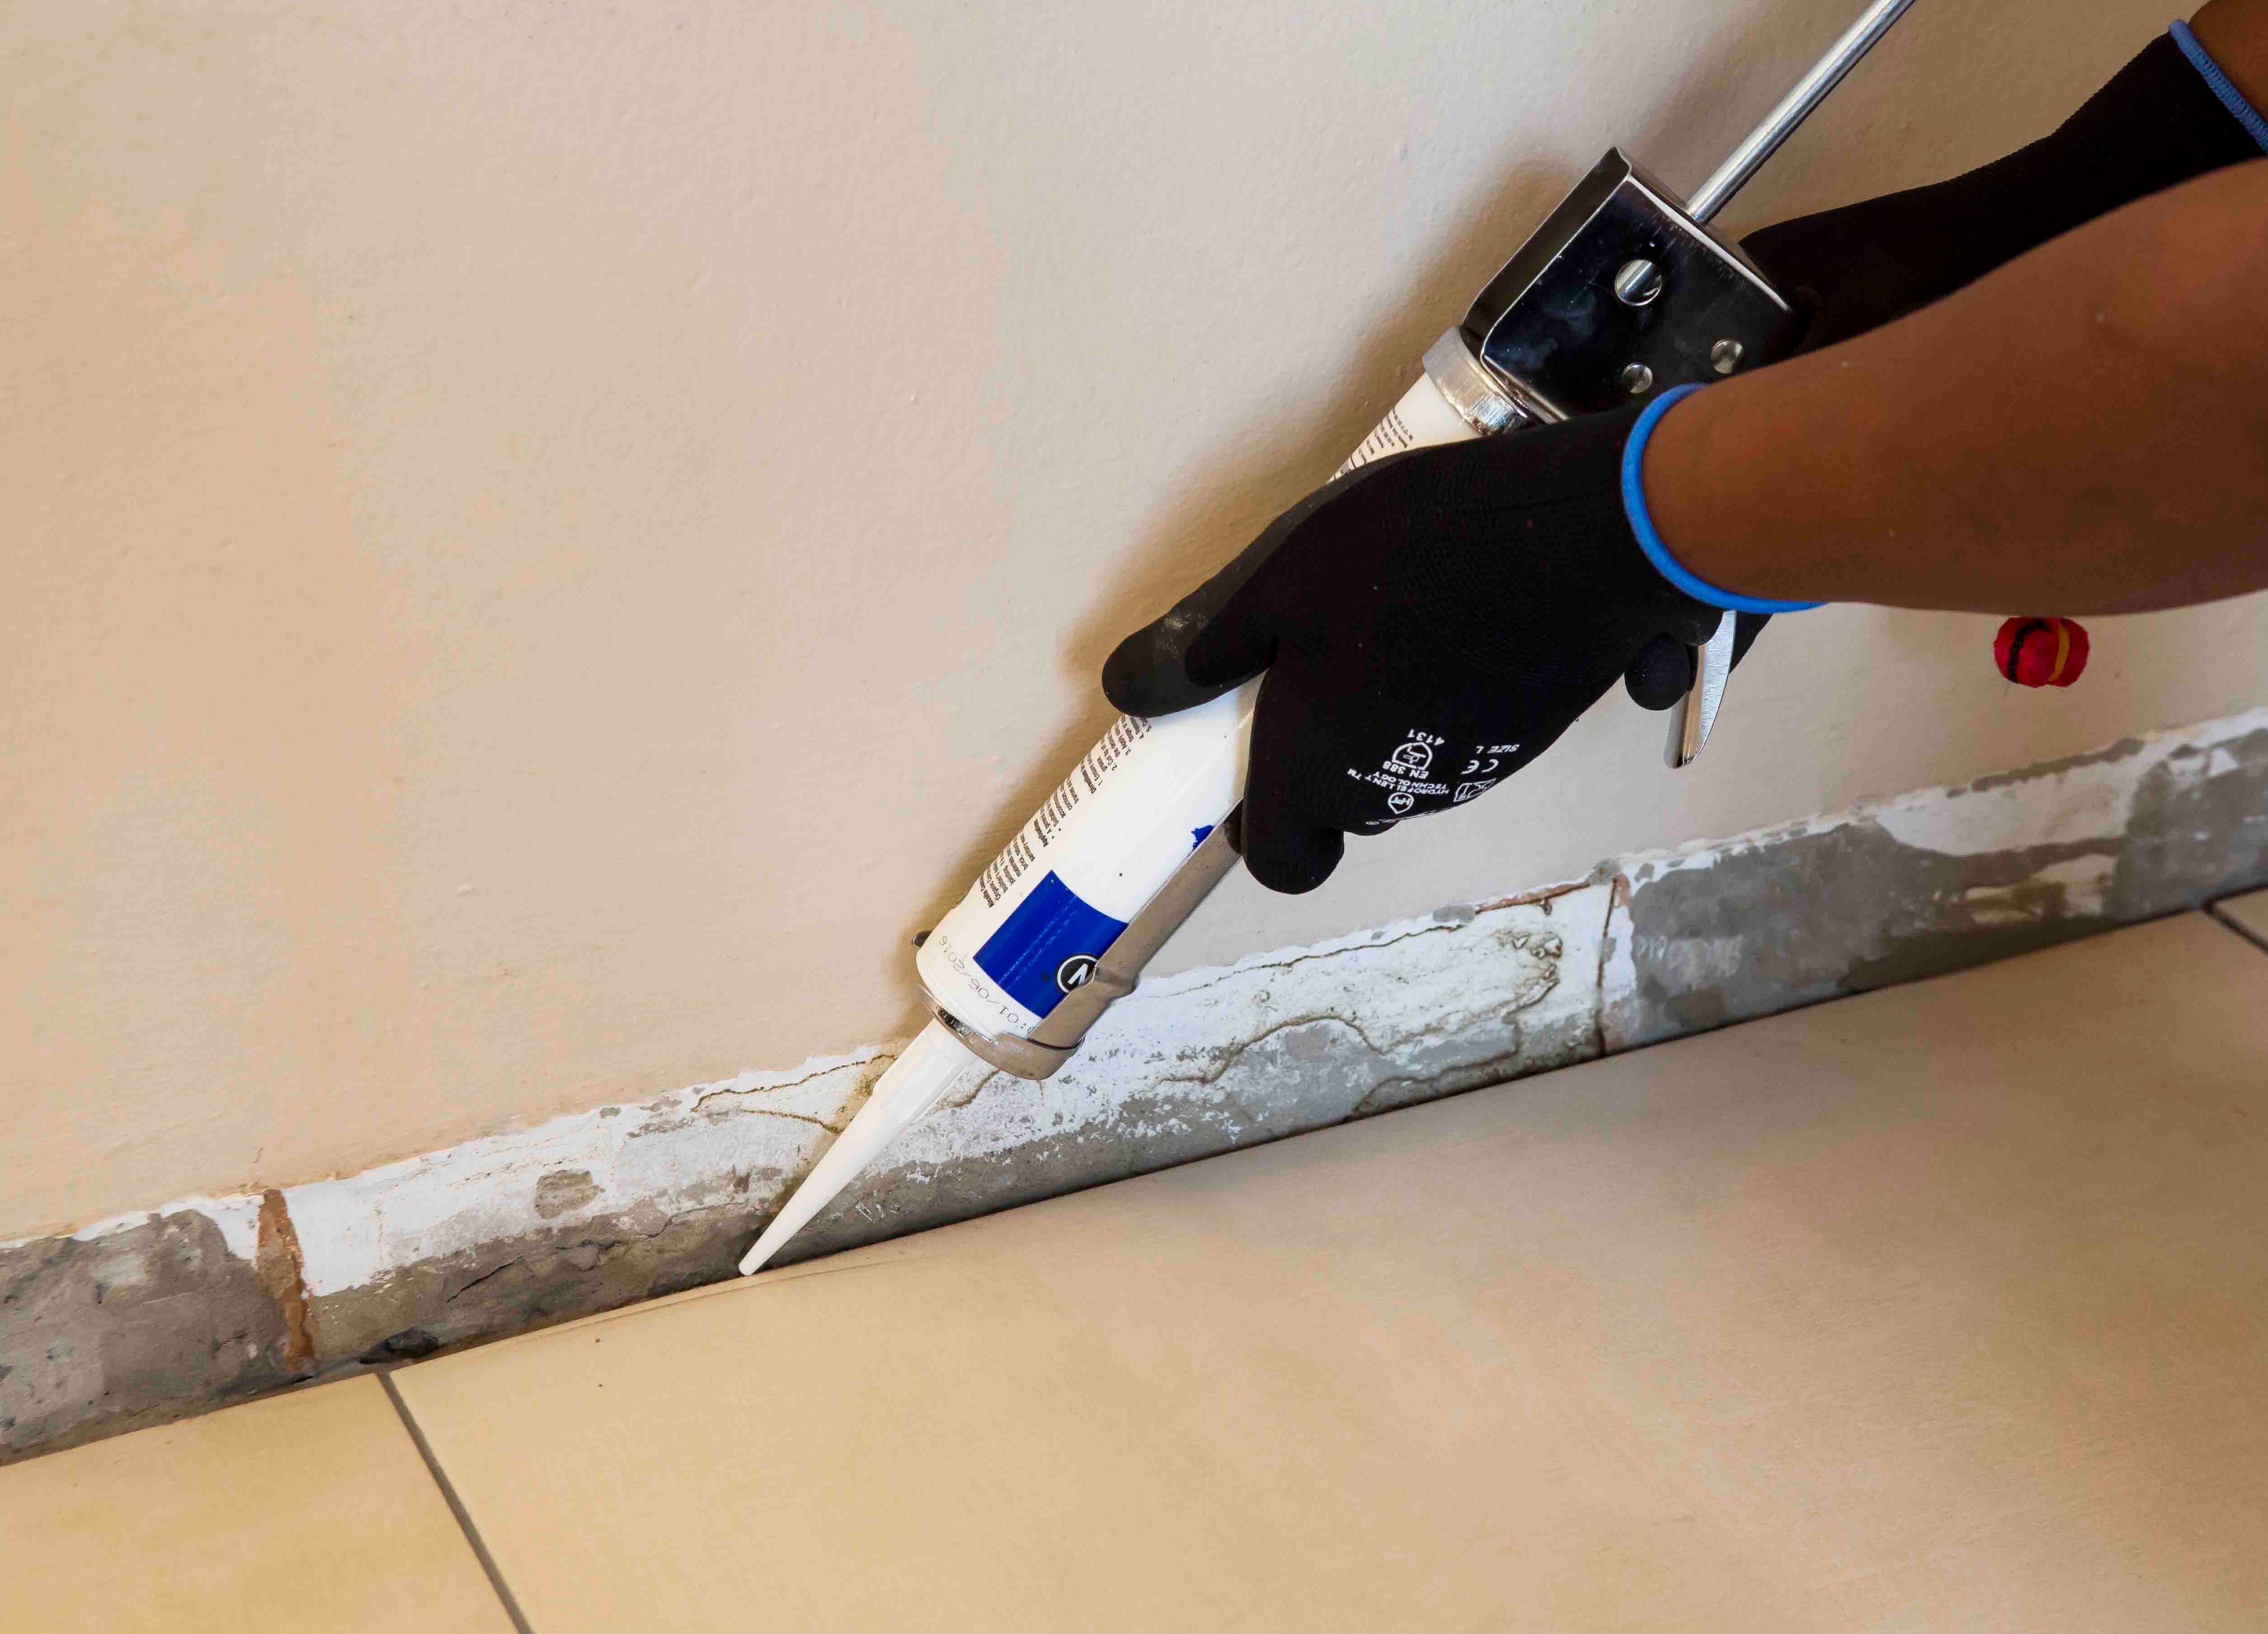
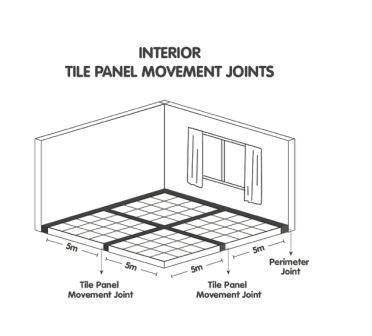
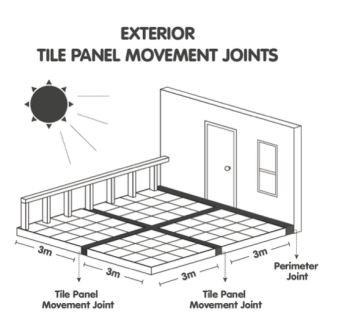
MOVEMENT JOINTS
Allowance for movement (building, thermal and moisture) must be made in all tile installations. Perimeter joints must be installed around the perimeter of all floors and around any fixtures protruding through the tile installation, such as walls, columns and stairs. Intermediate tile panel movement joints should also be installed at maximum 5 metre centres in both directions for interior surface bed applications, and maximum 3 metre centres for suspended slabs and exterior applications. These joints must be a minimum of 5mm wide, must extend through the tile and tile adhesive layers to the substrate, and must be filled with a good quality resilient joint sealant and suitable backing cord.
When using large format tiles (a tile with the length of at least one edge equal to/greater than 600mm, or a facial area greater than 3500cm²) there will be a smaller number of grout joints, compared with the same area of normal format tiling. As a result, less stress (movement) can be accommodated at tile joints.
Considering a wood-look tile installation? Give us a call or send usan email and we’ll give the right advice, no matter how big or small your tile installation: 0860000 TAL (825) or [email protected]. If this TAL Talk blog post interested you, you may want to take a look at this TAL Talk blog post: The 101 on wood-look tiles.
Complete the waterproofing system by replacing the water in the grout mix with TAL Bond, a latex additive, as this further increases the water resistance and flexibility of the installation.
Get the job right the first time and avoid future headaches from water seeping through and damaging the walls and floors of your home. The additional cost and effort of properly waterproofing your shower is an investment in your property and will ensure a beautiful and functional bathroom for years to come.
For more information on multi-level waterproofing systems, contact a TAL Expert on 0860 000 TAL (825), email us or watch our how-to video on YouTube for step-by-step advice on how to waterproof a shower.
STEP 8
Roll the area using a TAL Spiked Roller to facilitate the release of any trapped air to produce a smooth surface, and to allow it to dry.
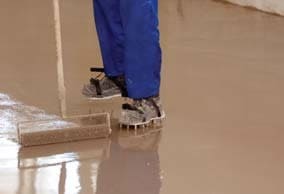
Allow the screed installation to dry for 24 hours before subjecting to foot traffic (or other trades) or installing floor coverings.
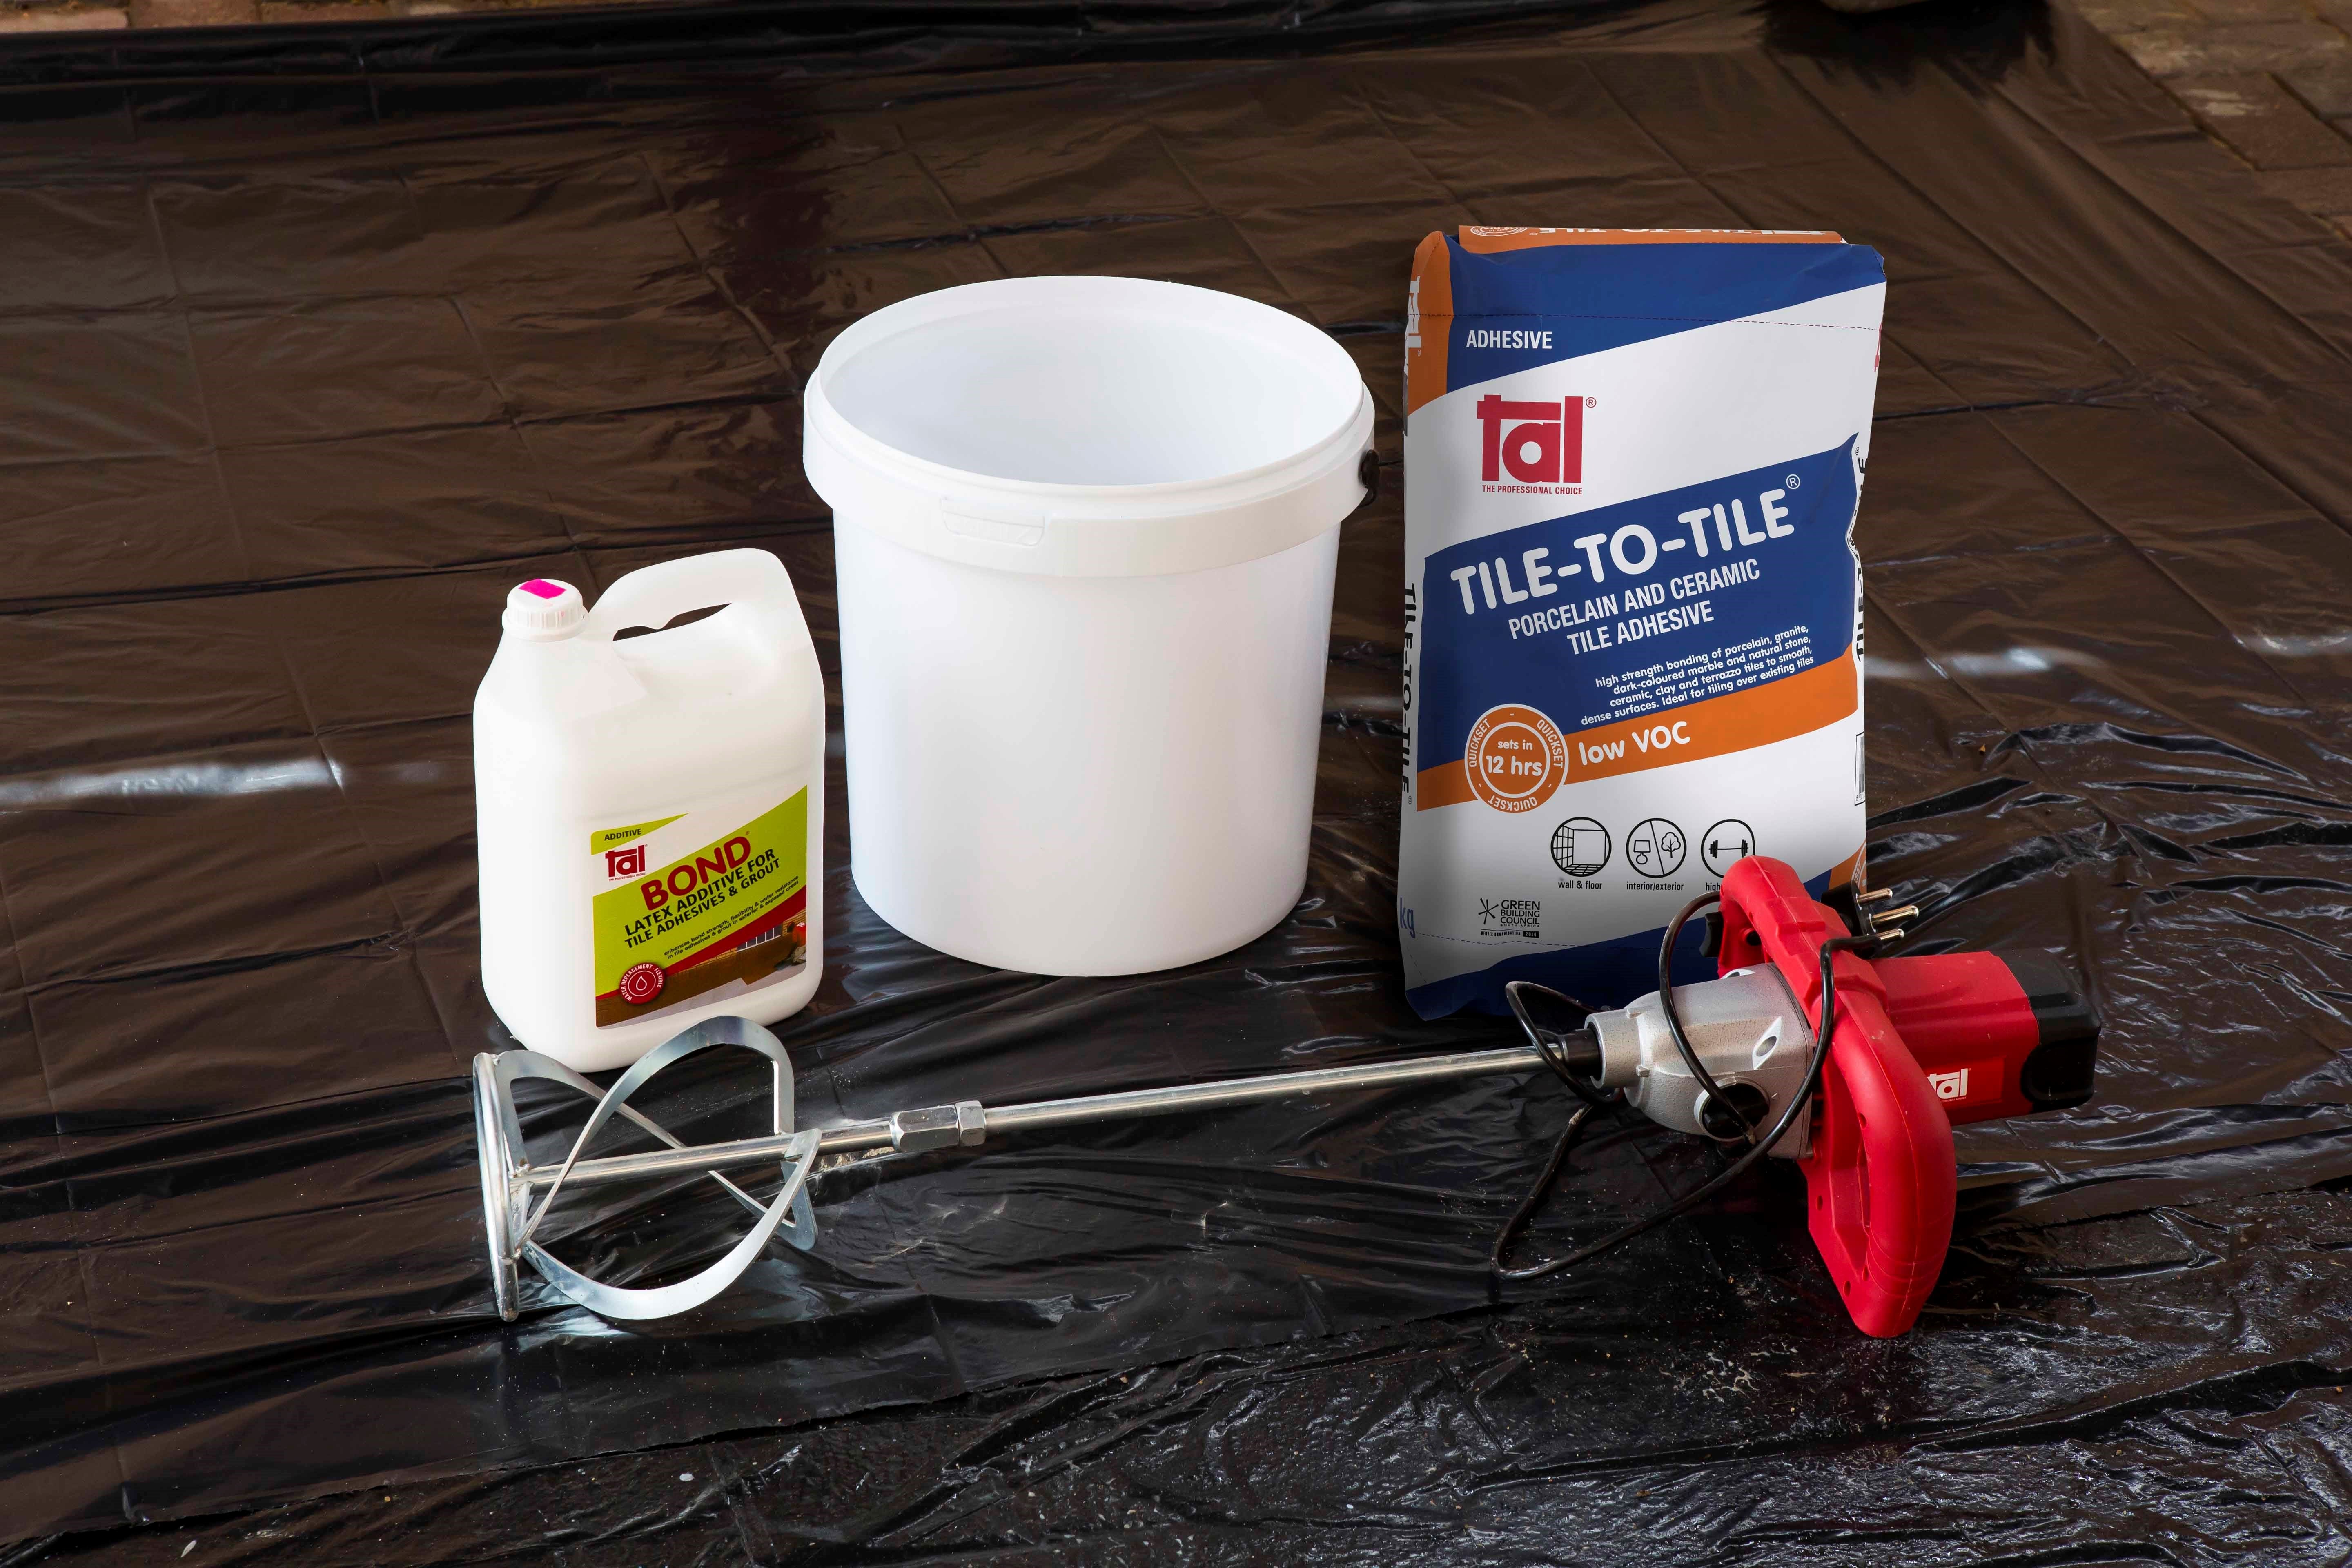
TAL MOSAICFIX is available in 20 kg and 5 kg bags from leading retail outlets.
Designed to be 100% compatible, using the TAL range of products ensures fully guaranteed multi-level tiling systems from a single source. TAL products are manufactured in South Africa to suit local climatic conditions.
If you are in any doubt, contact the TAL Technical Advisory Service on 0860 000 TAL (825), email [email protected]. Alternatively, employ the services of an experienced and skilled mosaic tiling contractor.
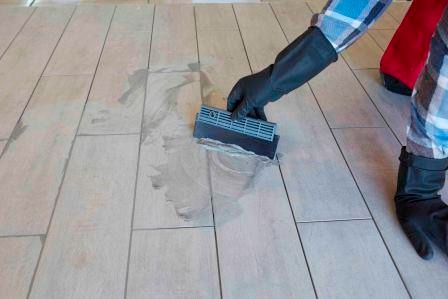
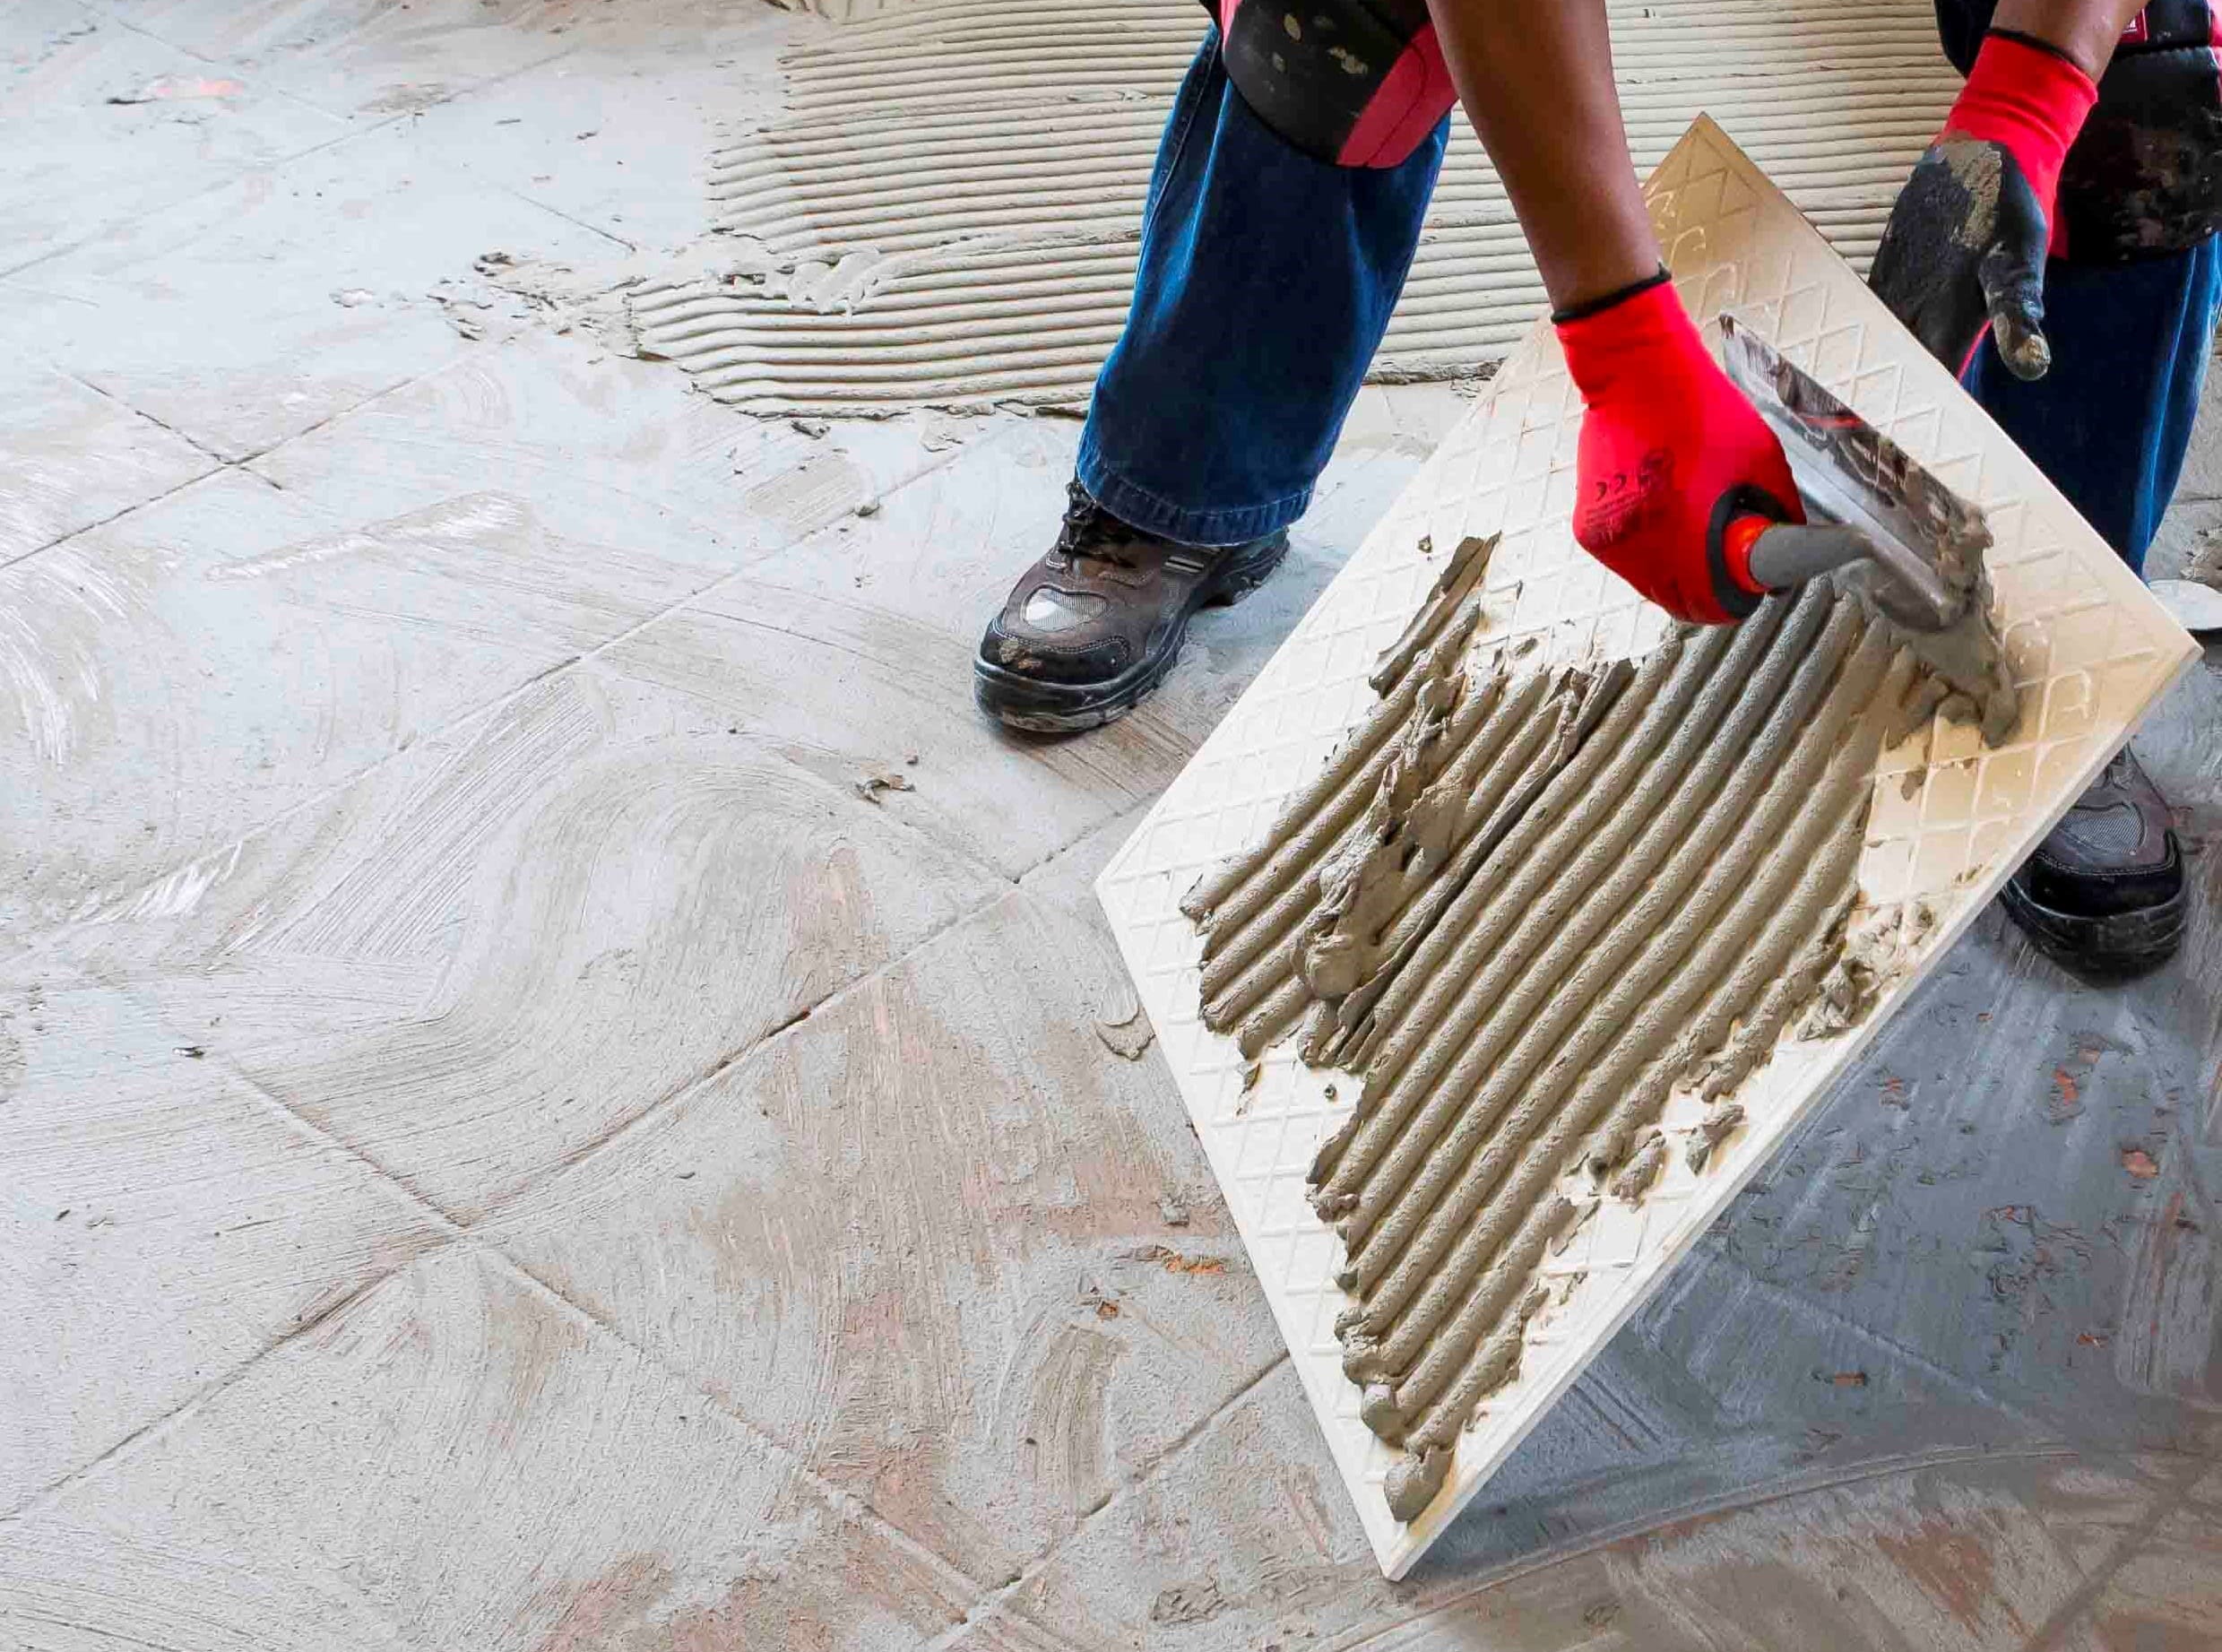
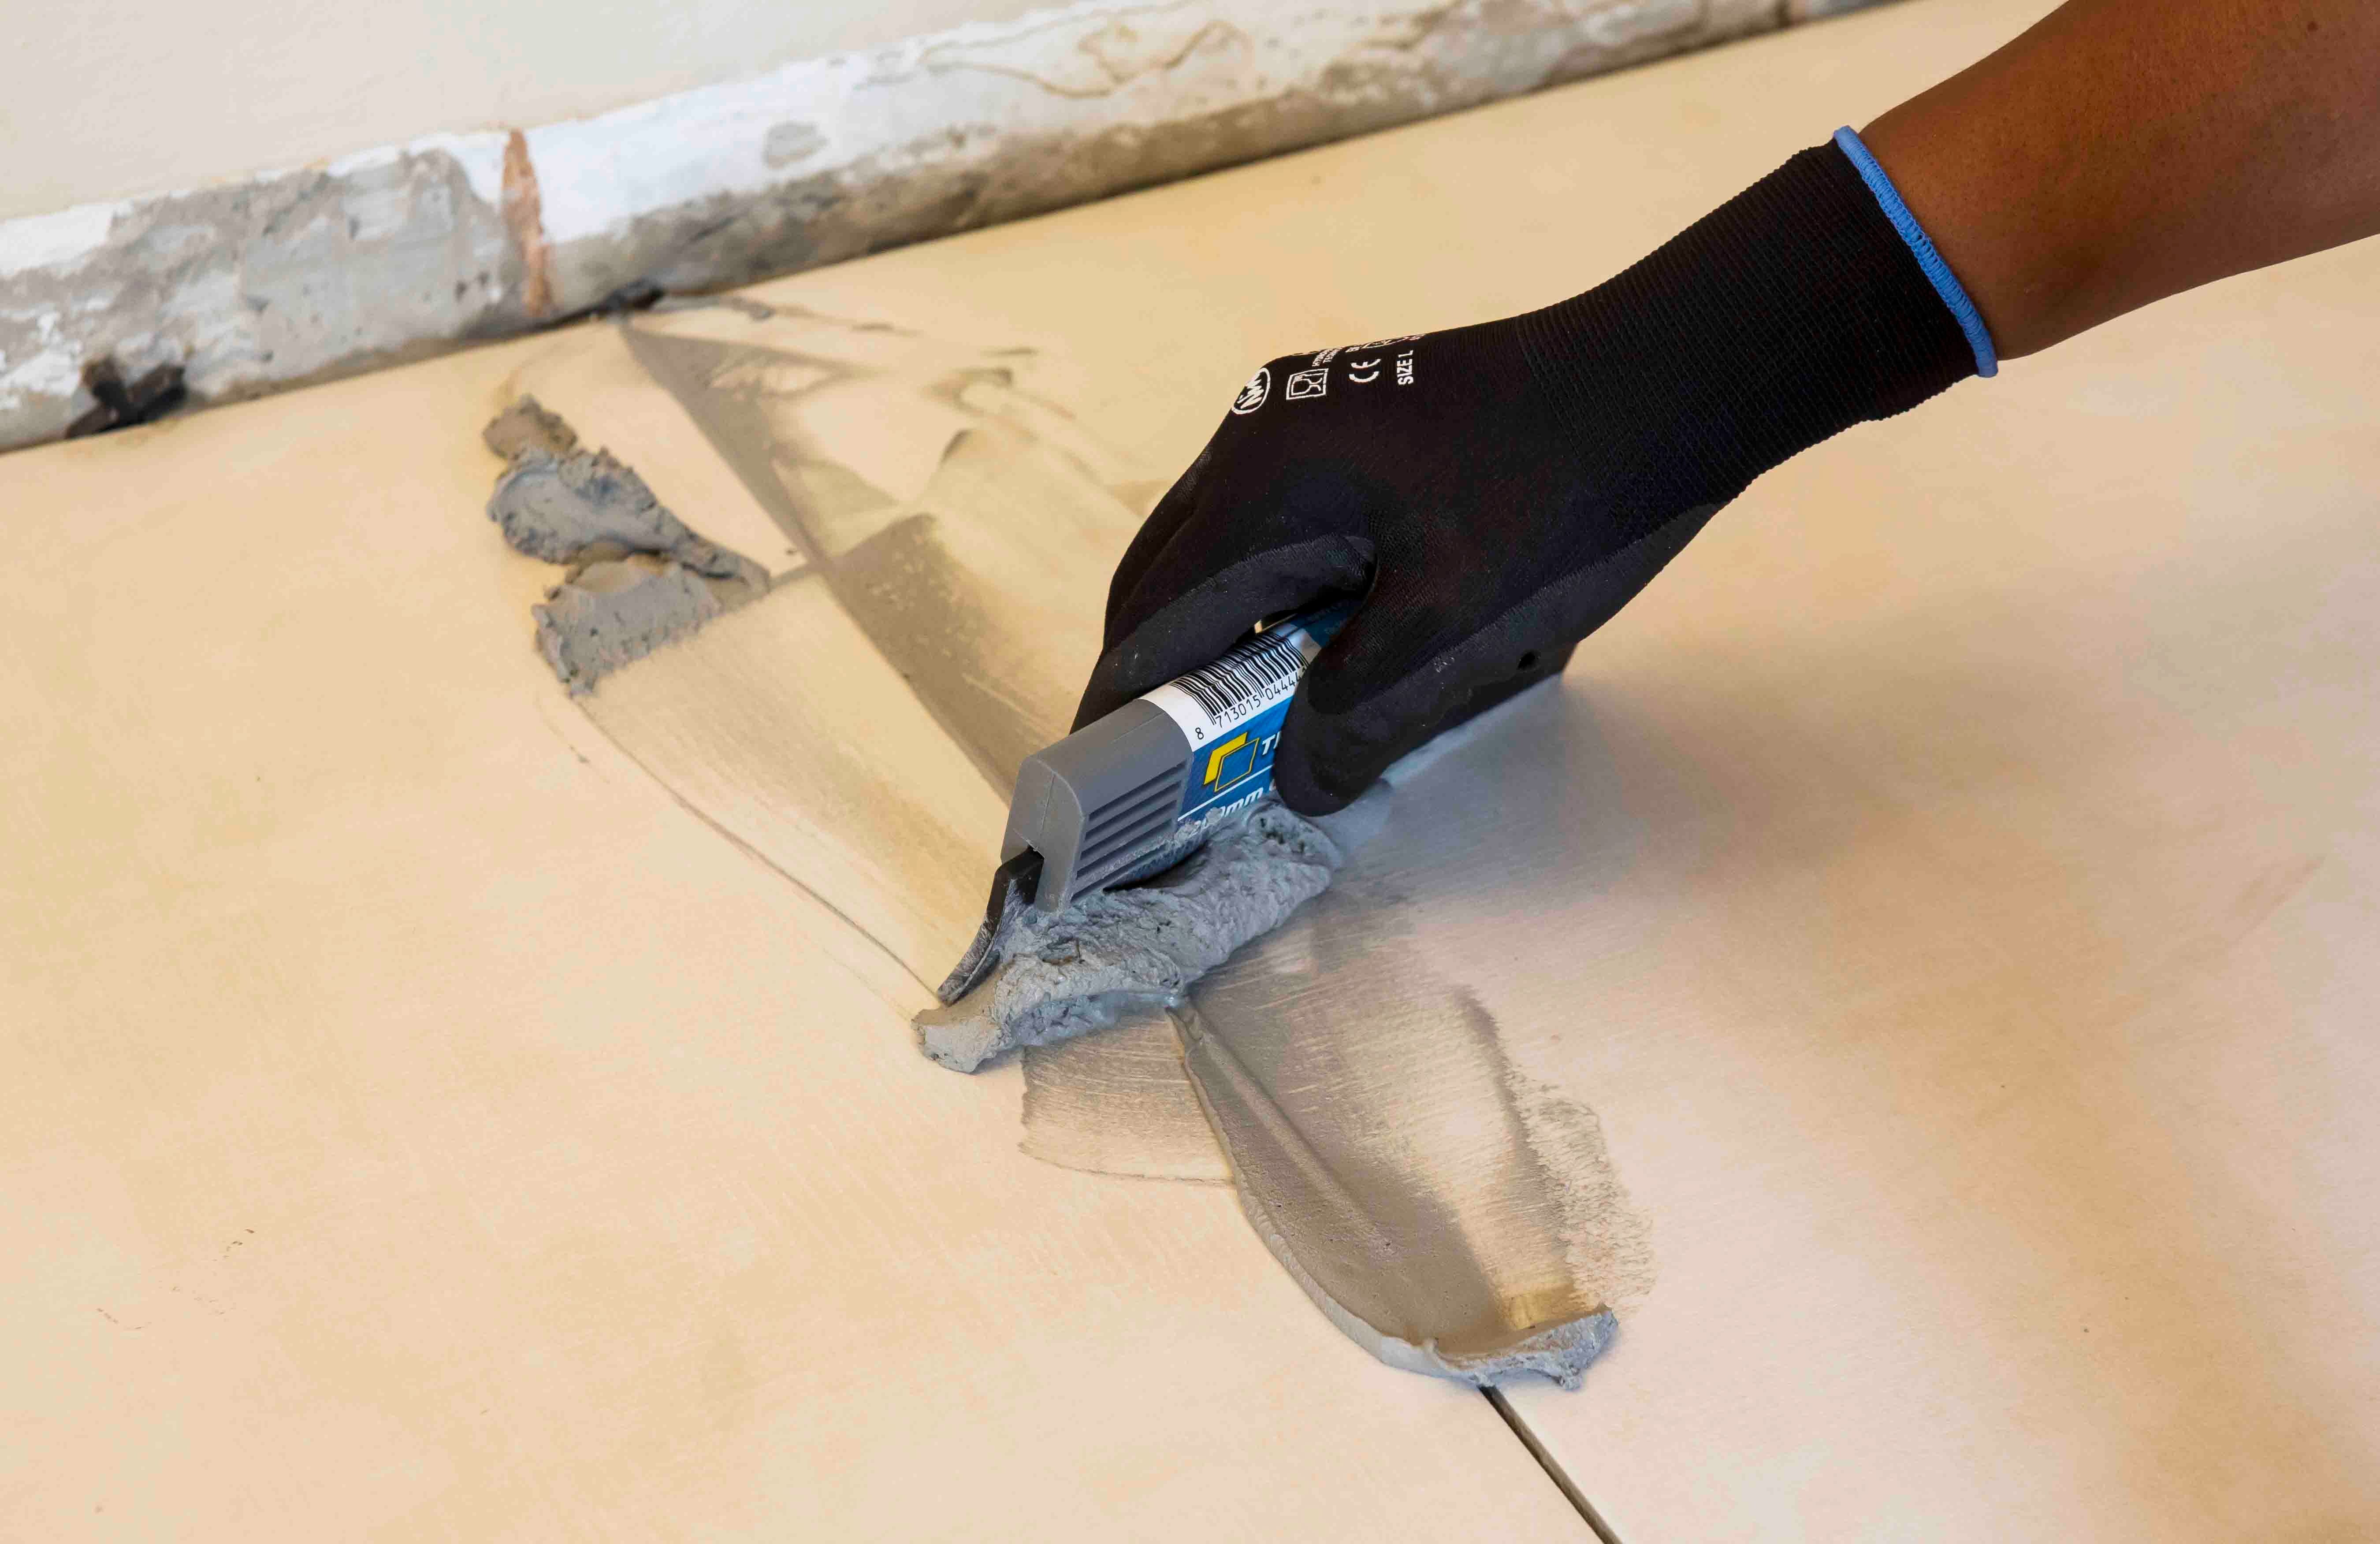
When replacing tiles, it is not always possible to apply the TALFIX directly to the floor, in which case apply the adhesive in a solid bed onto the back of the tile, ensuring complete coverage. Gently trace the notched side of a floor trowel through the adhesive to create ‘ridges’.
Adhesive system
When tiling onto existing tiles, it is important to only use a quick- or rapid-setting adhesive, as the existing tiles will present a dense, impervious surface, and standard-setting adhesives will take longer to dry. Too early trafficking of newly-installed tiles before the adhesive has set sufficiently can result in hollow-sounding or loose tiles.
Use TAL Tile-To-Tile quick-setting adhesive for tiling onto interior surface beds. When tiling onto suspended slabs and for external installations mix the TAL Tile-To-Tile with TAL Bond, replacing the water in the mix. Alternatively, TAL Bond Powder can be added to the adhesive mixing water.
Ensure that there is a solid bed of adhesive at least 6 mm thick beneath each tile.
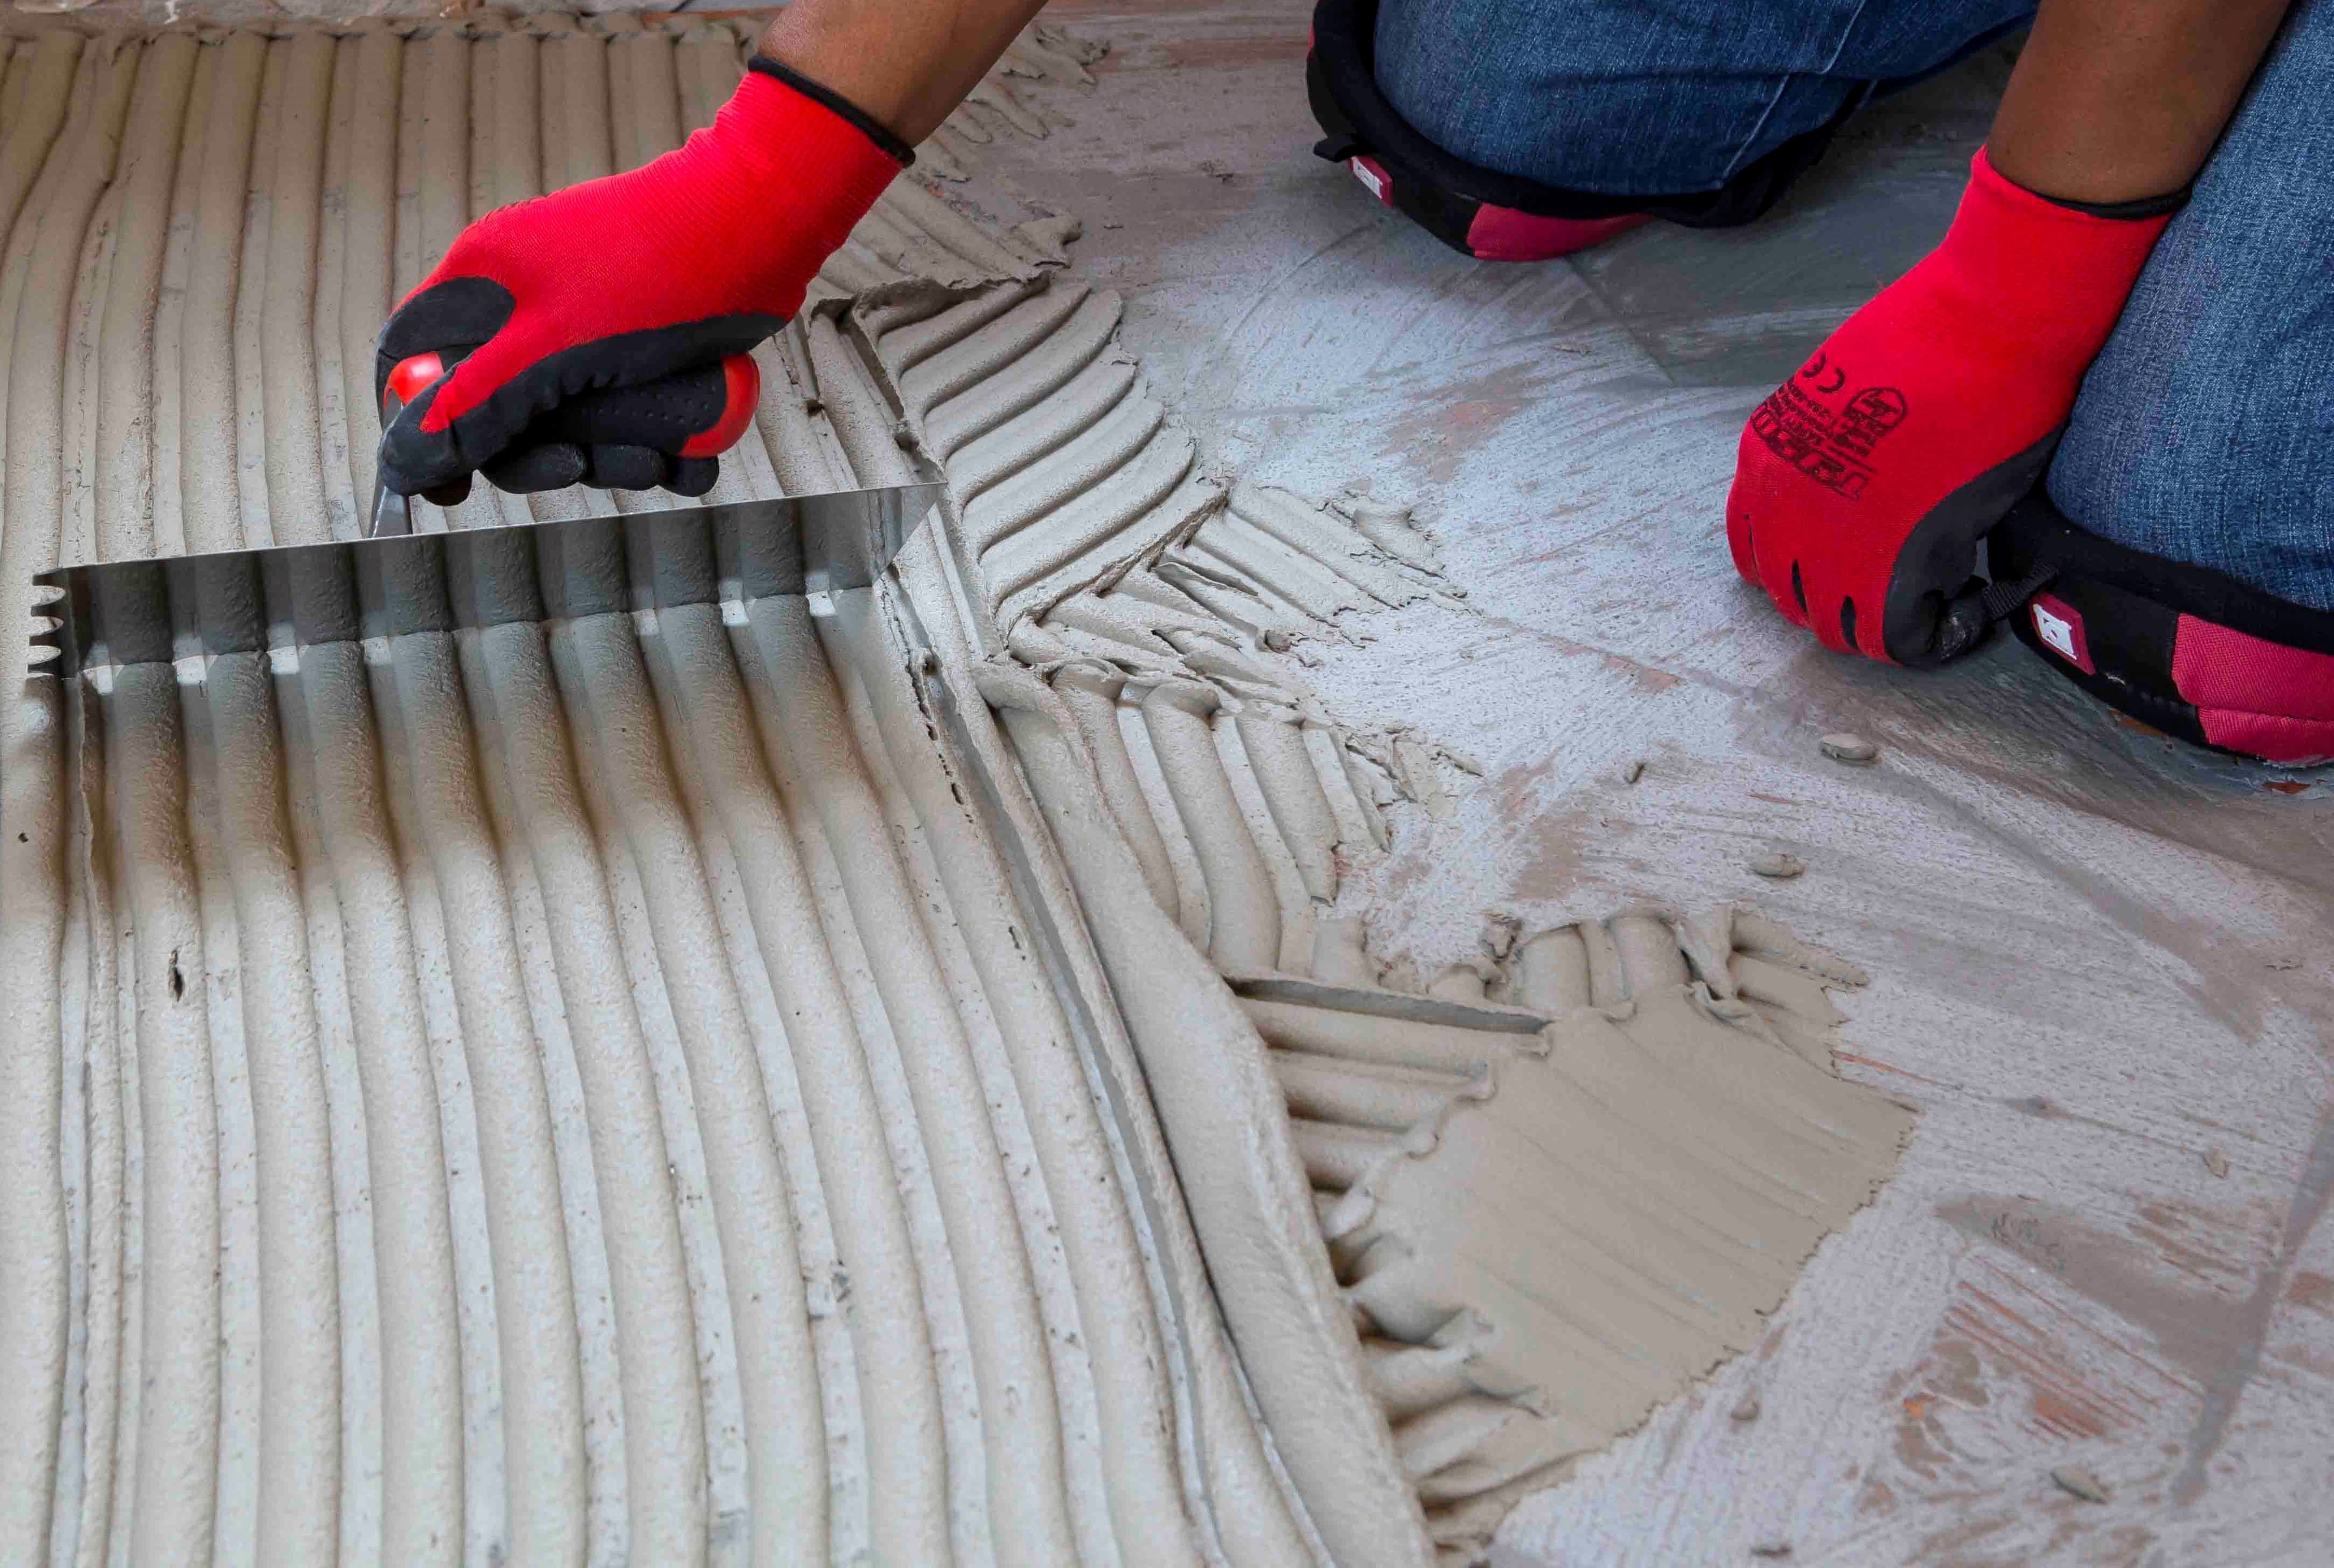
Back buttering with a thin coat of adhesive may also be required when using large-format tiles to ensure full contact with the adhesive bed.
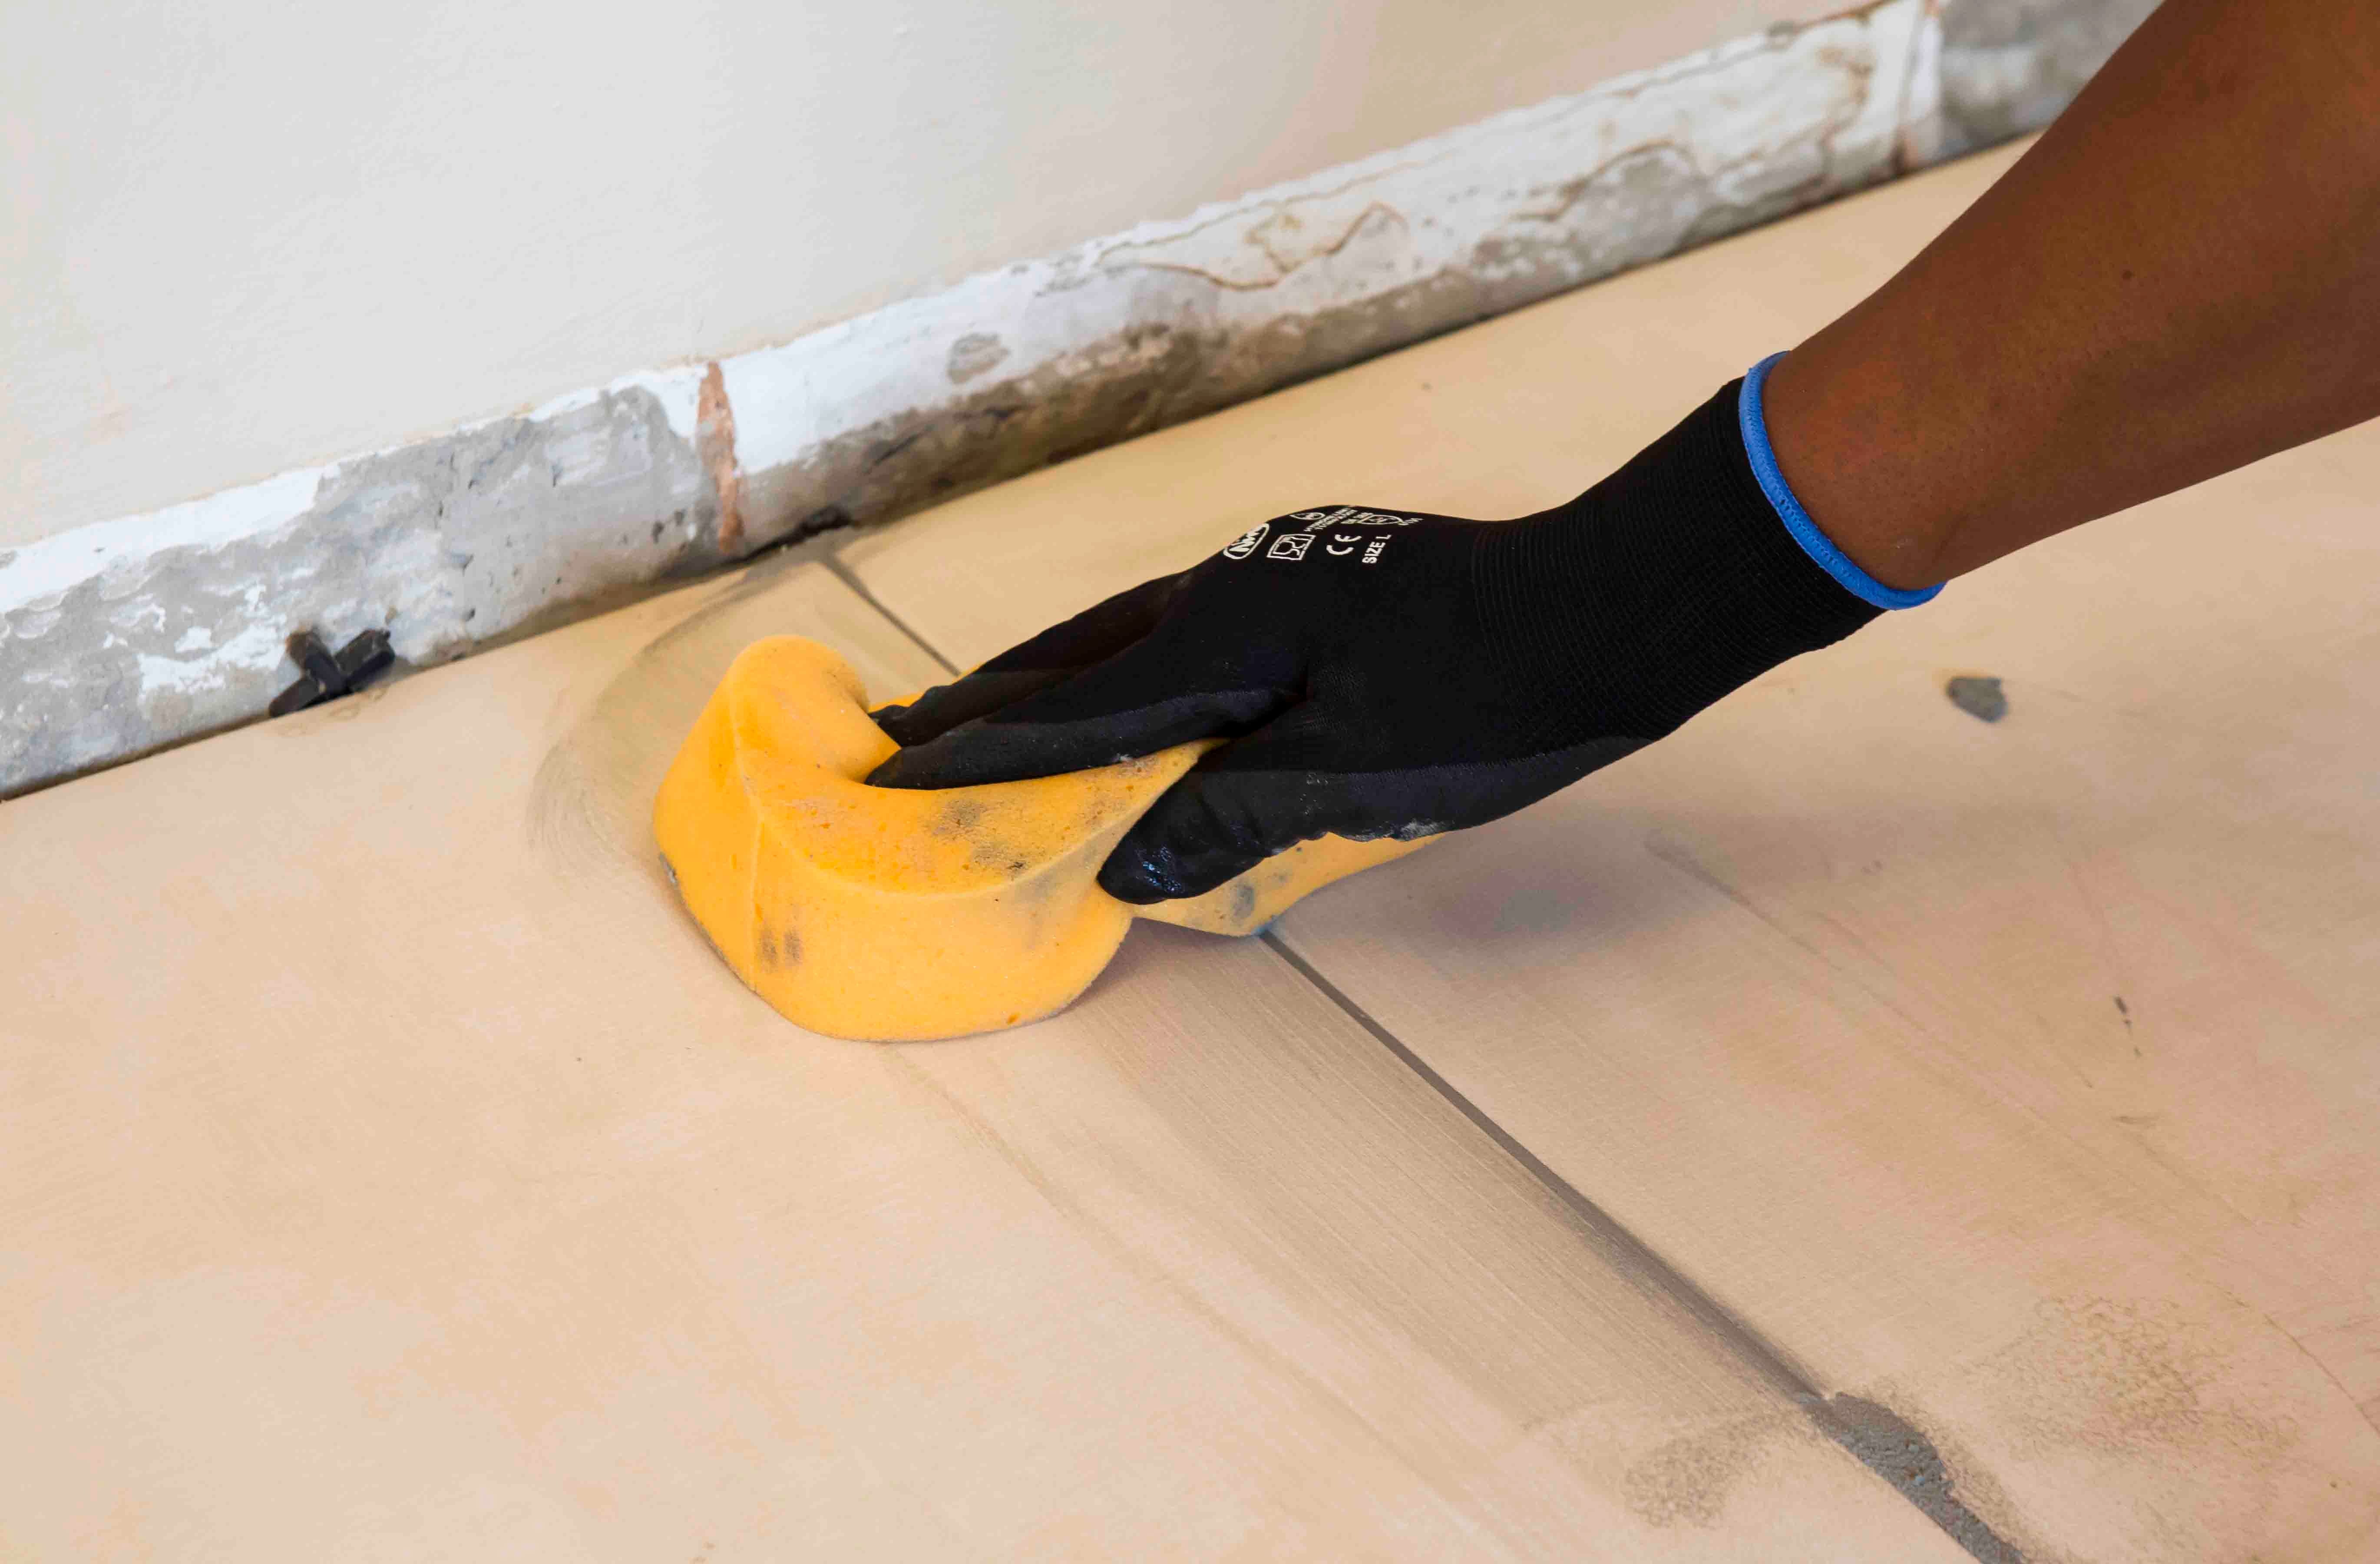
Grouting
Grouting should not be carried out until the adhesive has set sufficiently to prevent the tile installation from being disturbed during the grouting operation (always refer to the adhesive packaging for setting times). When using TAL TAL Tile-To-Tile, allow a minimum of six hours before grouting.
For interior surface beds, use TAL Wall & Floor Grout for filling tile joints up to 8 mm wide. TAL Quarry Grout can be used in wider joints up to 25 mm wide. On suspended slabs and for external installations, replace the water in the grout mix with TAL Bond, or add TAL Bond Powder to the grout mixing water.
Particular care must be taken to clean the grout off the tile face before it hardens completely. This is especially important when an additive such as TAL Bond or TAL Bond Powder has been used. A tile sample should be tested beforehand to ensure that no grout is absorbed through the glaze or into the tile body, thereby staining the tiles permanently.
Movement joints
The lack of movement joints in tile installations is a major cause of tile failure. When tiling over existing tiles, the existing structural and movement joints must be maintained in the new tile installation. The movement joints should be at least 5 mm wide and extend through the adhesive and both tile layers.